
Homework 3: IntLists
Before you start this assignment you should have:
- Watched Lecture 5 on IntLists.
- Looked at the Lecture 5 code on GitHub.
Follow the Assignment Workflow Guide to get started with this assignment. This starter code is in the hw03 folder.
This homework has two parts:
- Implementing an IntList method.
- Using the Debugger.
Starter Code
This assignment uses IntList as described in lecture.
public class IntList {
    int first;
    IntList rest;

    public IntList(int first, IntList rest) {
        this.first = first;
        this.rest = rest;
    }

    /** Return the number of ints in this list. */
    public int size() {
        if (this.rest == null) {
            return 1;
        }
        return this.rest.size() + 1;
    }

    /** Returns the int at index i. */
    public int get(int i) {
        if (i == 0) {
            return this.first;
        }
        return rest.get(i - 1);
    }

    /** Returns the int at index i, using an iterative approach. */
    public int getIterative(int i) {
        IntList current = this;
        while (i > 0) {
            current = current.rest;
            i -= 1;
        }
        return current.first;
    }

    /** Return a new list with the same ints, but incremented by 1. */
    public IntList incrementRecursiveNonDestructive() {
        IntList incremented = new IntList(first + 1, null);
        if (rest != null) {
            incremented.rest = rest.incrementRecursiveNonDestructive();
        }
        return incremented;
    }

    public static void main() {
        IntList l1 = new IntList(5, new IntList(10, new IntList(15, null)));

        IntList l2 = new IntList(5, null);
        l2.rest = new IntList(10, null);
        l2.rest.rest = new IntList(15, null);

        IntList l3 = new IntList(15, null);
        l3 = new IntList(10, l3);
        l3 = new IntList(5, l3);
    }
}
Task 1: Filling in an IntList method
In lecture, we wrote an instance method incrRecursiveNonDestructive that incremented every value of the list using recursion. This method was Non-destructive.
Reminder that “Non-destructive” means that if we run:
IntList L = new IntList(5, null);
L.rest = new IntList(7, null);
L.rest.rest = new IntList(9, null);

IntList M = incrRecursiveNondestructive(L, 3);
Then M should be 8 -> 10 -> 12 -> null and L should remain 5 -> 7 -> 9 -> null.
In this homework, you should instead write a static destructive version of the method. We’re doing this just so you can get some more practice with writing IntList code, it’s not any better or worse than the non-static non-destructive version.
To do this, fill in the incrRecursiveDestructive method in the provided code.
    /**
     * Returns an IntList identical to L, but with
     * each element incremented by x. Modifies the original list.
     * You are not allowed to use "new" in this method.
     */
    public static IntList incrRecursiveDestructive(IntList L, int x) {
        // TODO: Fill in this code
        return null;
    }
This method should be destructive (also called “mutating” or “in-place”), i.e. it modifies the original list. That is, if you run the code below:
IntList L = new IntList(5, null);
L.rest = new IntList(7, null);
L.rest.rest = new IntList(9, null);

IntList M = incrRecursiveDestructive(L, 3);
Then both L and M should be 8 -> 10 -> 12 -> null.
Sometimes, a destructive implementation is simpler to write than a non-destructive implementation, though in this specific case it’s about the same difficulty.
This assignment has one hidden test, which tests for whether your method is recursive or not.
If you want more practice, we’ve provided a few additional optional methods that you can implement in the IntList class: sum(), addLast(int x), and addFirst(int x). These methods are described in the source code.
Introducing the Debugger
Why use the debugger?
In previous classes, you might have used print debugging to debug: adding print statements to see the values of certain variables as a program runs. While print debugging can be very useful, it has a few disadvantages:
- It requires you to modify your code, and clean it up after.
- It’s tedious to decide and write out exactly what you want to print. Printing isn’t always formatted nicely.
In this second part of the homework, we’ll show you a new technique, interactive debugging – debugging by using an interactive tool, or a debugger. We’ll focus on IntelliJ’s built-in debugger.
Breakpoints
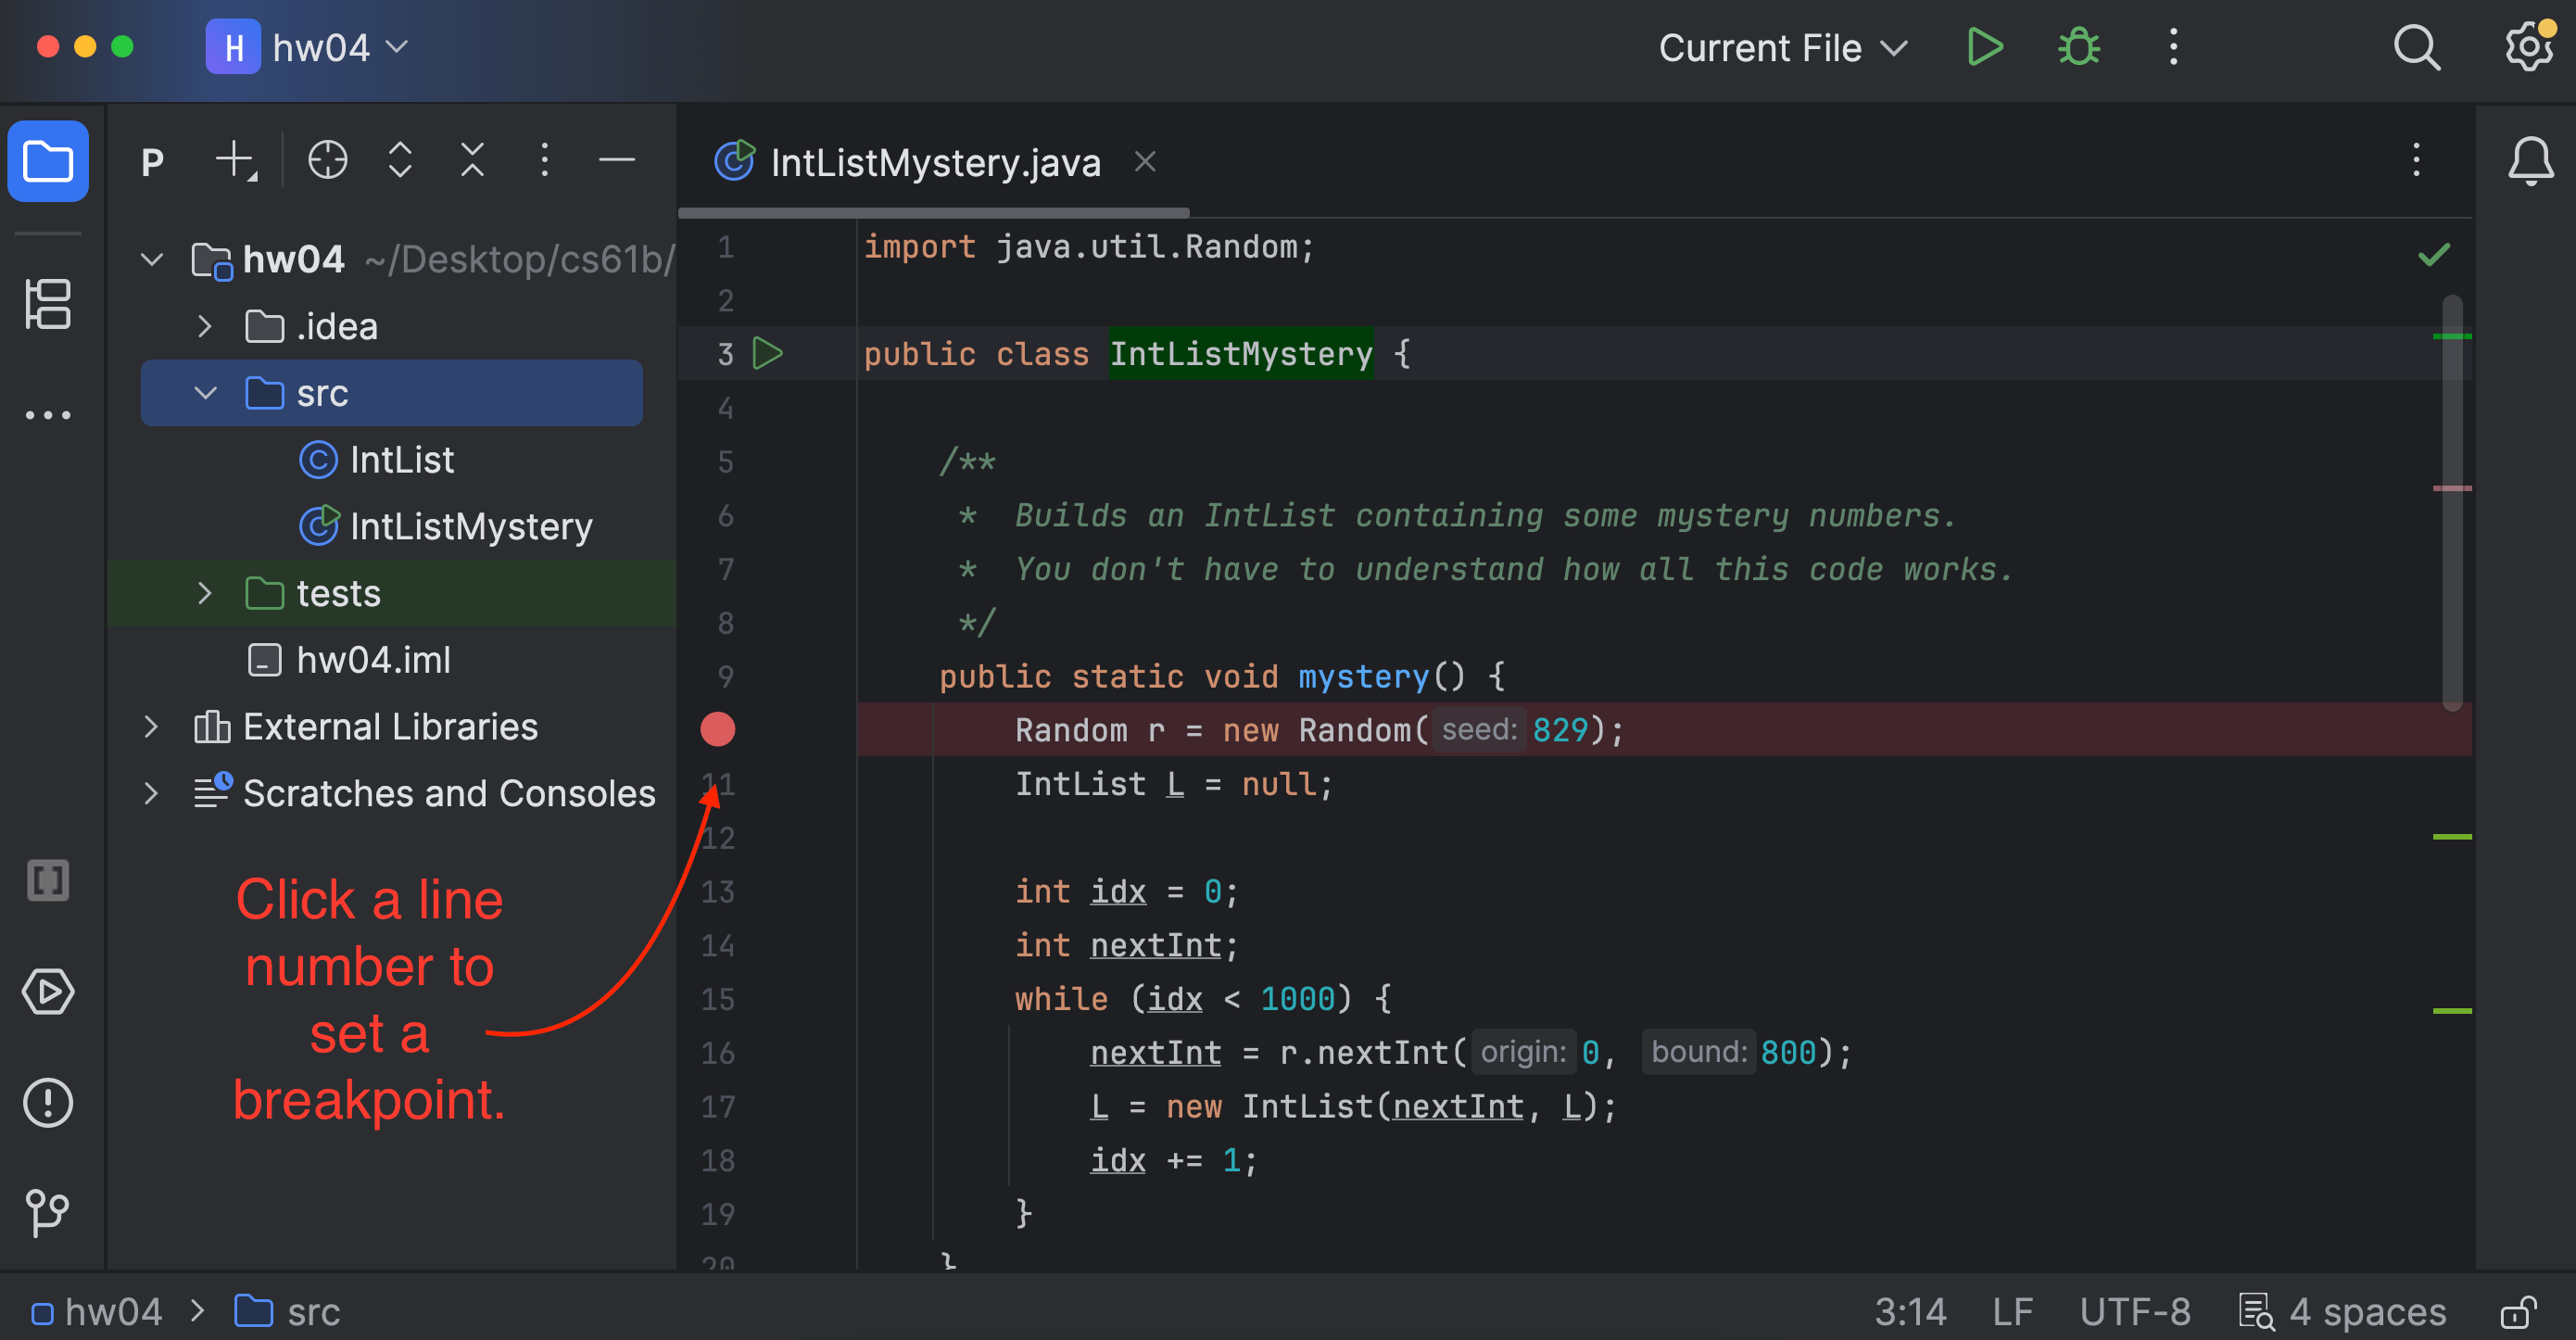
Before starting the IntelliJ debugger, you should set a few breakpoints. Breakpoints mark places in your code where you can pause the program and see the values of all the variables. This:
- Doesn’t require you to modify your code or clean it up after, since breakpoints are ignored in normal execution.
- Lets you see all the variables without needing to write print statements.
- Lets IntelliJ display everything in a structured manner.
To set a breakpoint, click the area just to the right of the line number.
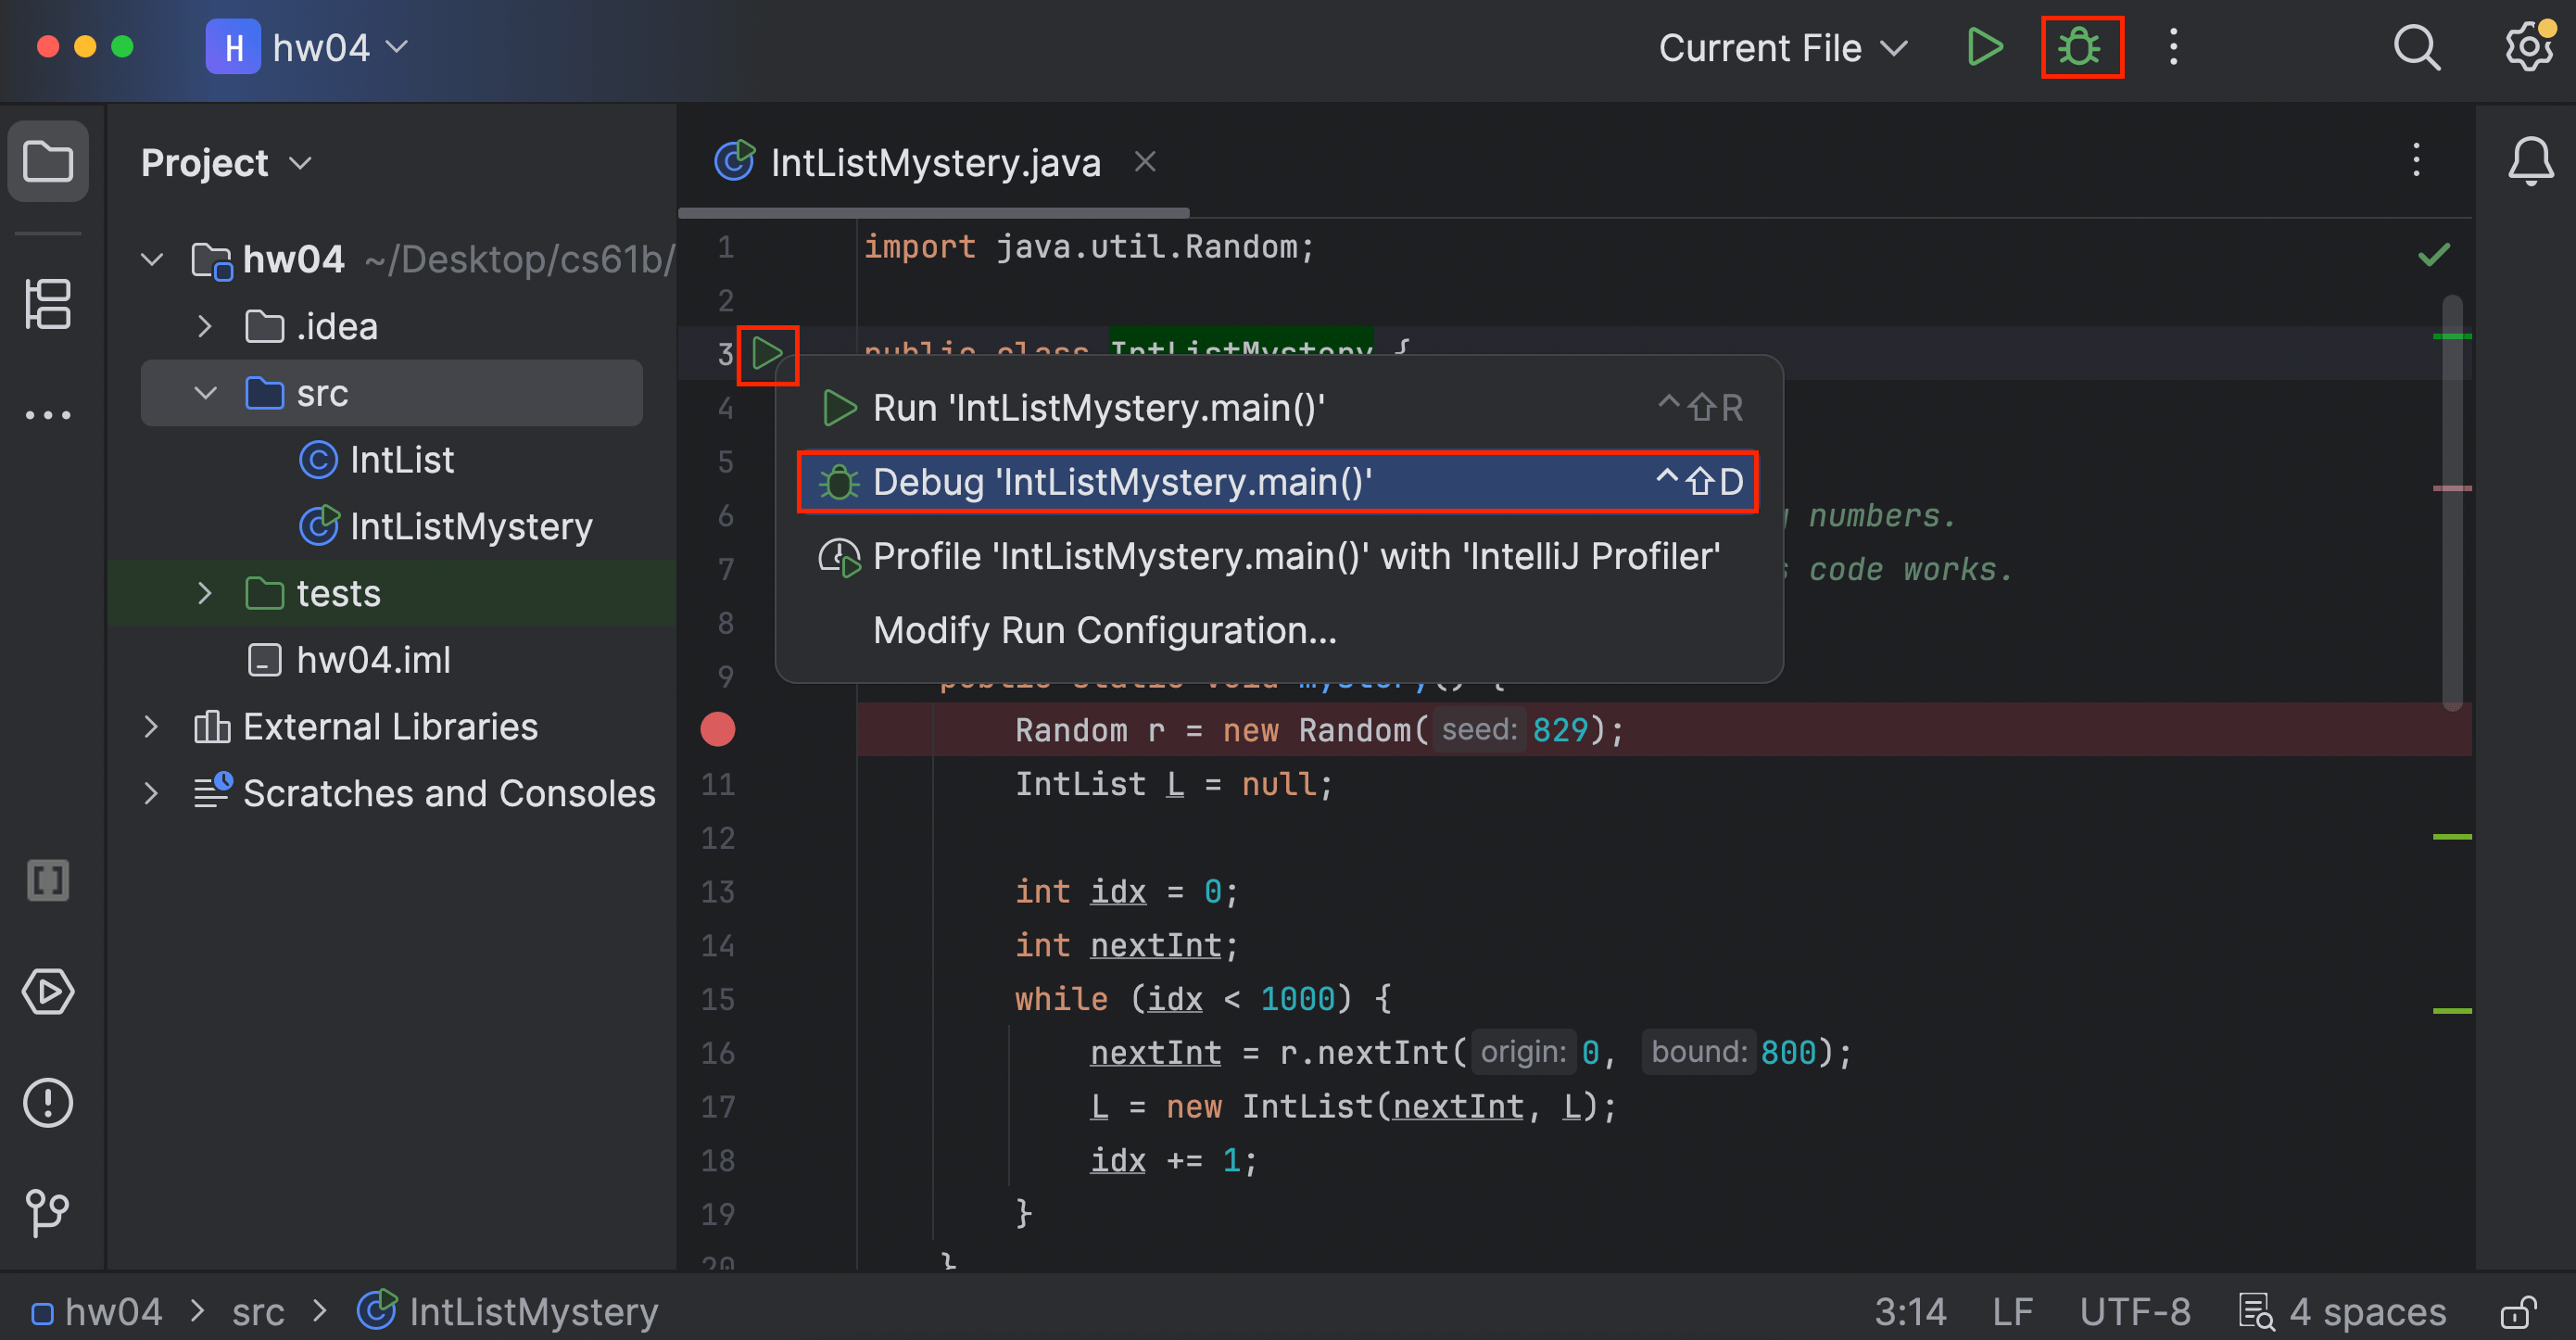
Interactive debugging
After setting breakpoints, we can start a debugging session! Click on the green triangle next to the class or test you want to debug (in test files there may be two green triangles). Instead of clicking the green triangle to run, click the  debug option:
The program will now run until it hits its first breakpoint. A debugger window should also appear on the bottom of the interface, where the console was.
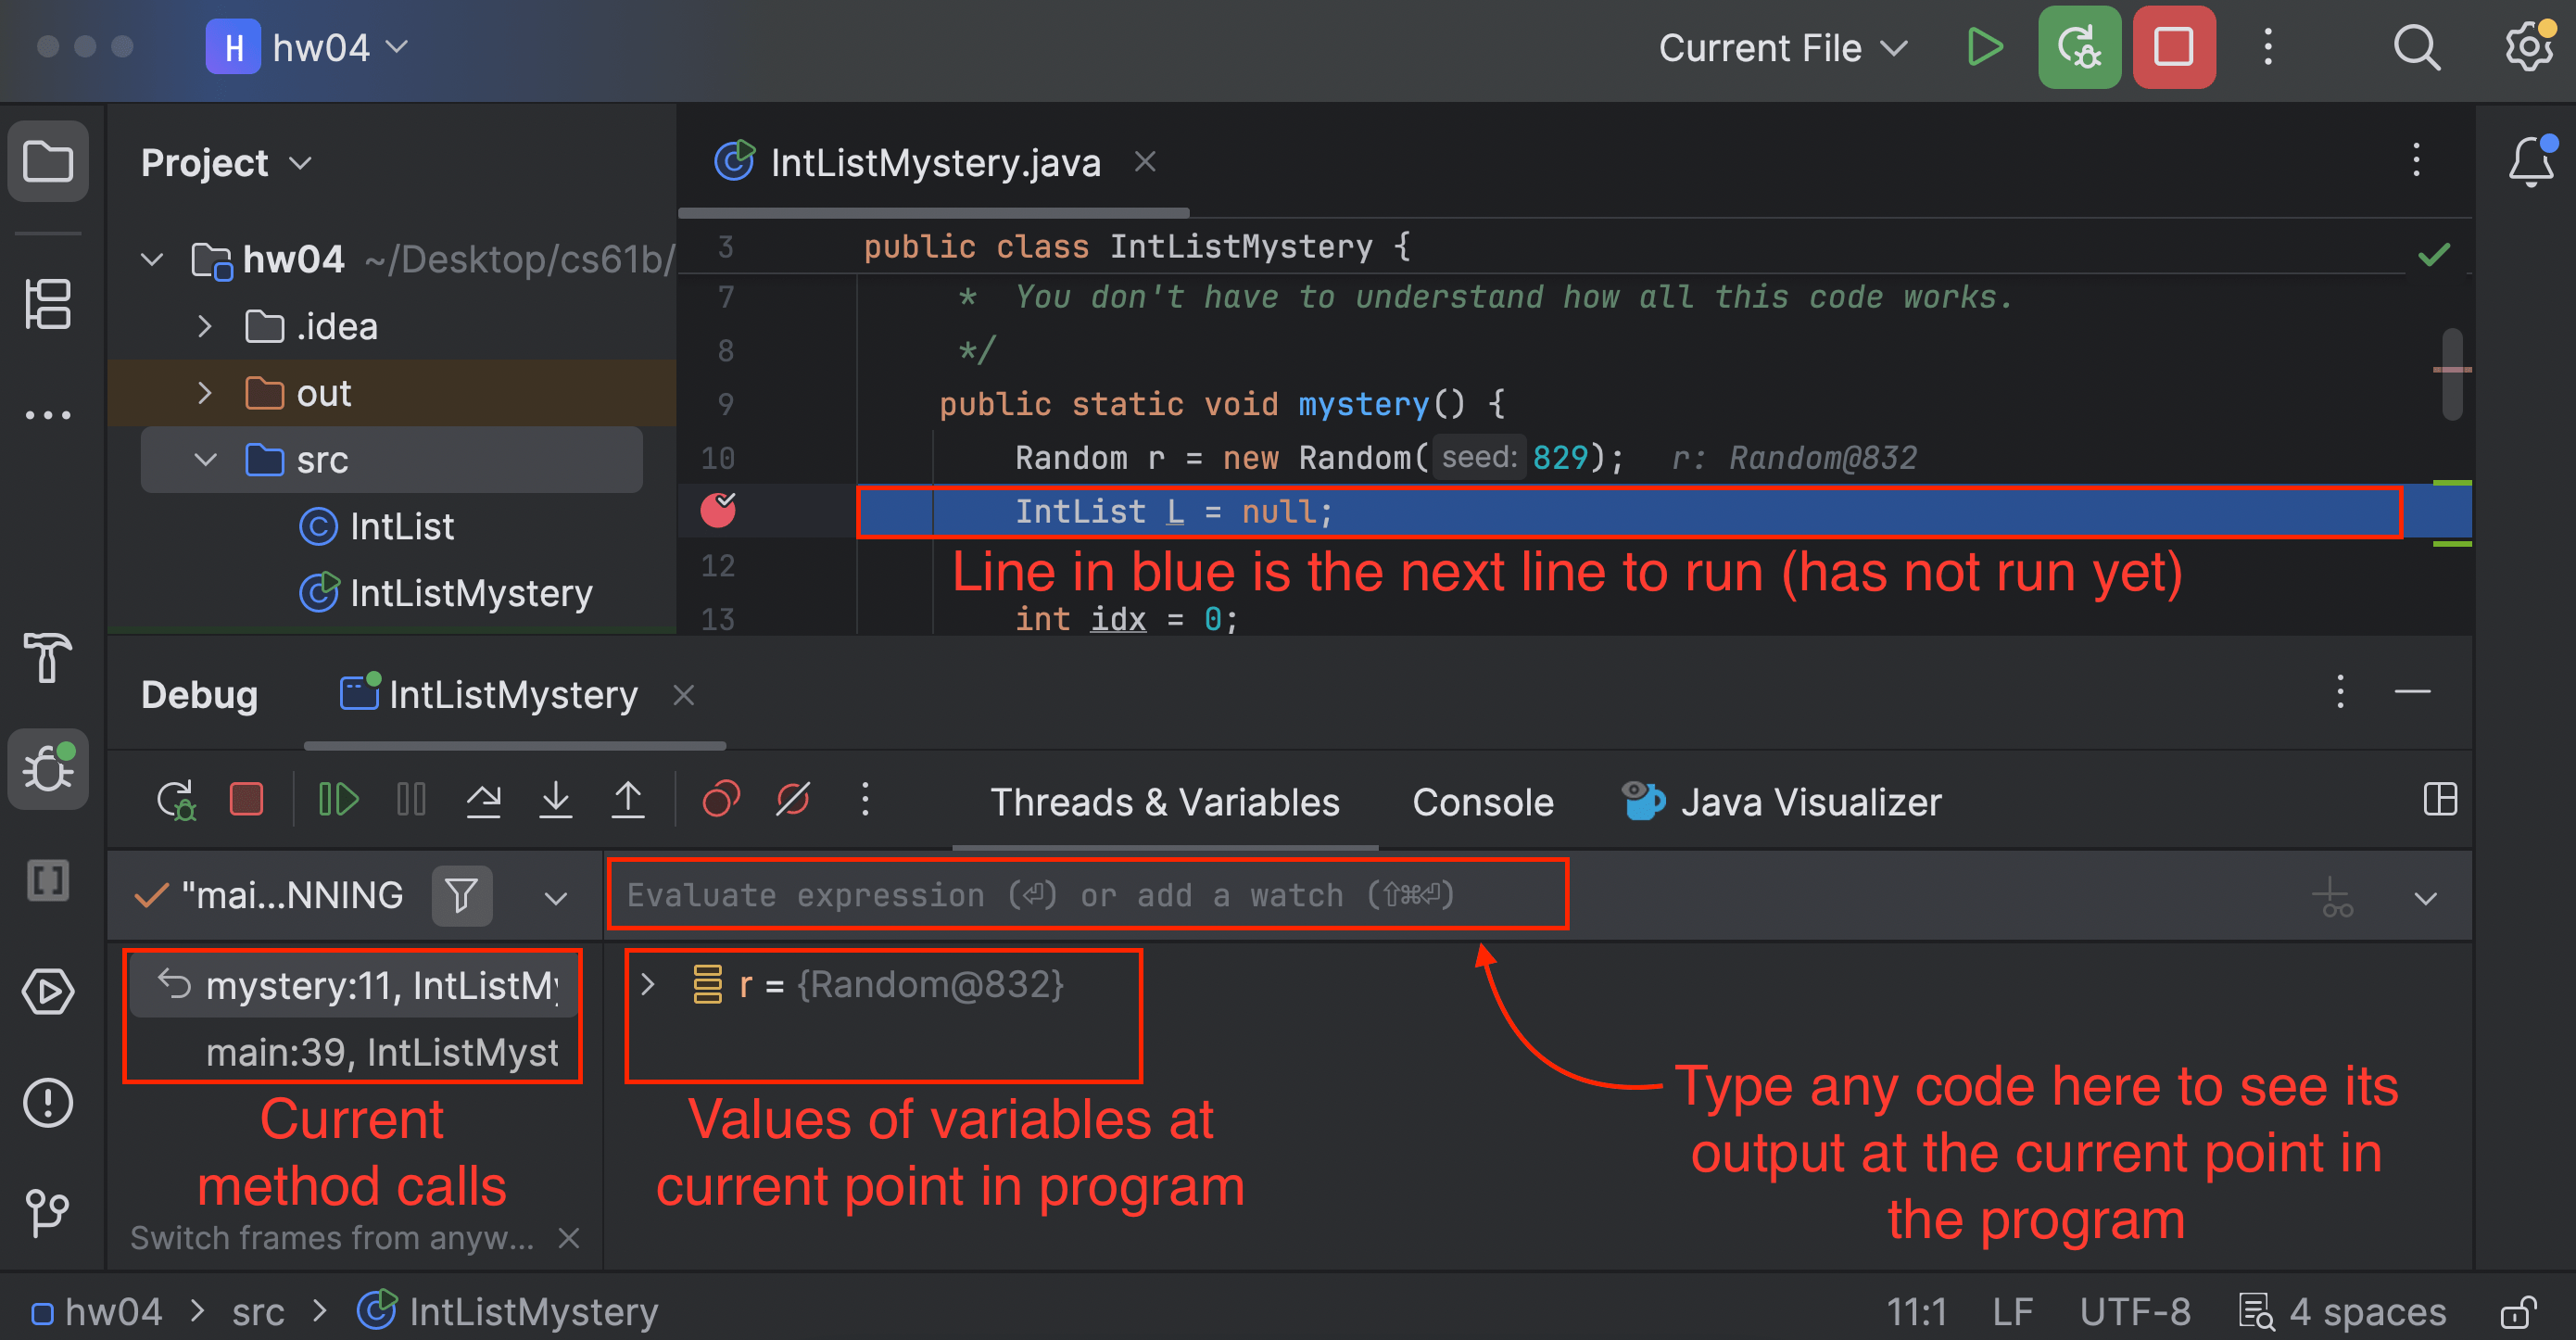
On the left, you will be able to see all current method calls and on the right, you will be able to see the values of instantiated variables at this point in the program (they will also be shown in gray text in the editor). For instances of classes, you can click the dropdown to expand them and look at their fields.
In the debugger, you have a few options:
- Learn something from the displayed values, identify what’s wrong, and fix your bug! Click
 to stop the debug session.
 - Click
 to resume the program (until it hits another breakpoint or terminates).
 - Click
 to advance the program by one line of code.
 does something similar, but it will step into any method called in the current line, while will step over it.
 will advance the program until after it returns from the current method.
- If you accidentally step too far and want to start the session over, click
 (at least right now, there isn’t a good way to directly step back).
Task 2: Using the Debugger
In IntListMystery.java, the mystery function creates an IntList and adds some mystery numbers to it. (You don’t have to understand the code in mystery.)
Set a breakpoint in the mystery function. Then, start the debugger, so that the program runs until the first time it reaches your breakpoint. From the debugger, can you figure out the first number added to the IntList?
If you’d like to view a box-and-pointer diagram in the debugger, click “Java Visualizer” in the debugger:
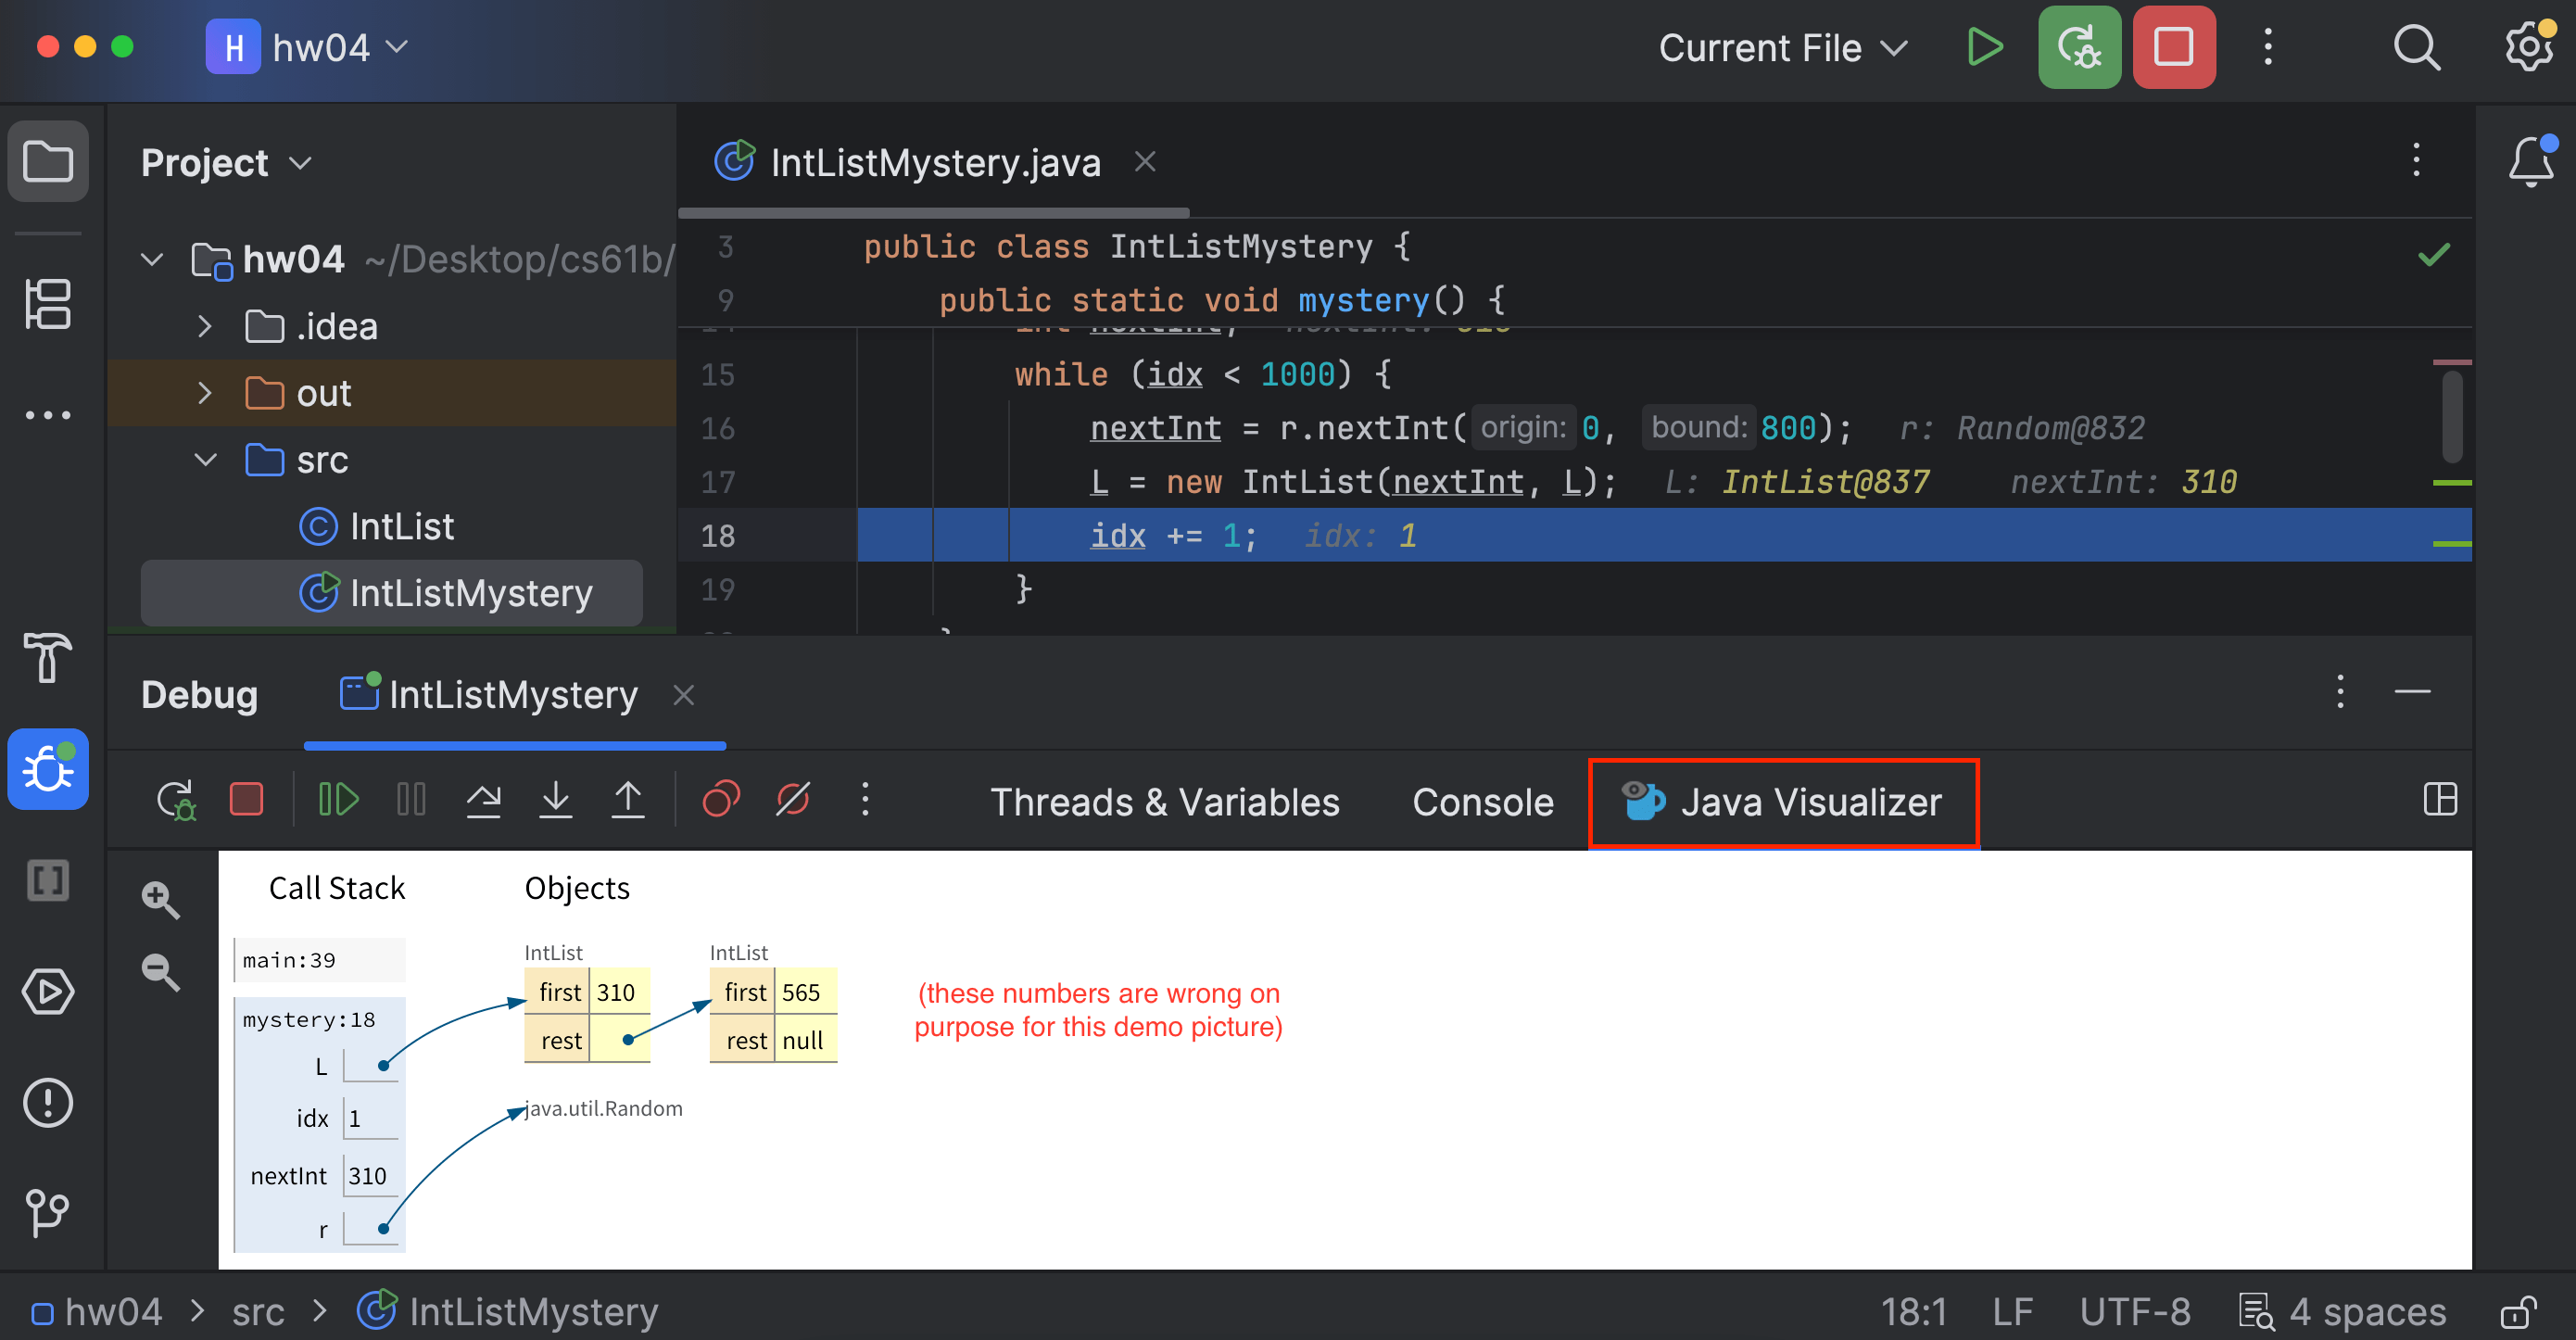
Your task: Use the debugger buttons (described above) to figure out the first 5 numbers added to the mystery IntList. Then, write the numbers in the firstFiveNumbers method.
Task 3: Conditional Breakpoints
Consider a program that loops 5000 times. Trying to step through each time to find the error wouldn’t be too efficient. Instead, you would want your program to pause on a specific iteration, such as the last one.
In other words, you would want your program to pause on certain conditions. To do so, create a breakpoint at the line of interest and open the “Edit breakpoint” menu by right-clicking the breakpoint icon itself. There, you can enter a boolean condition such that the program will only pause at this breakpoint if the condition is true. It will look something like this:
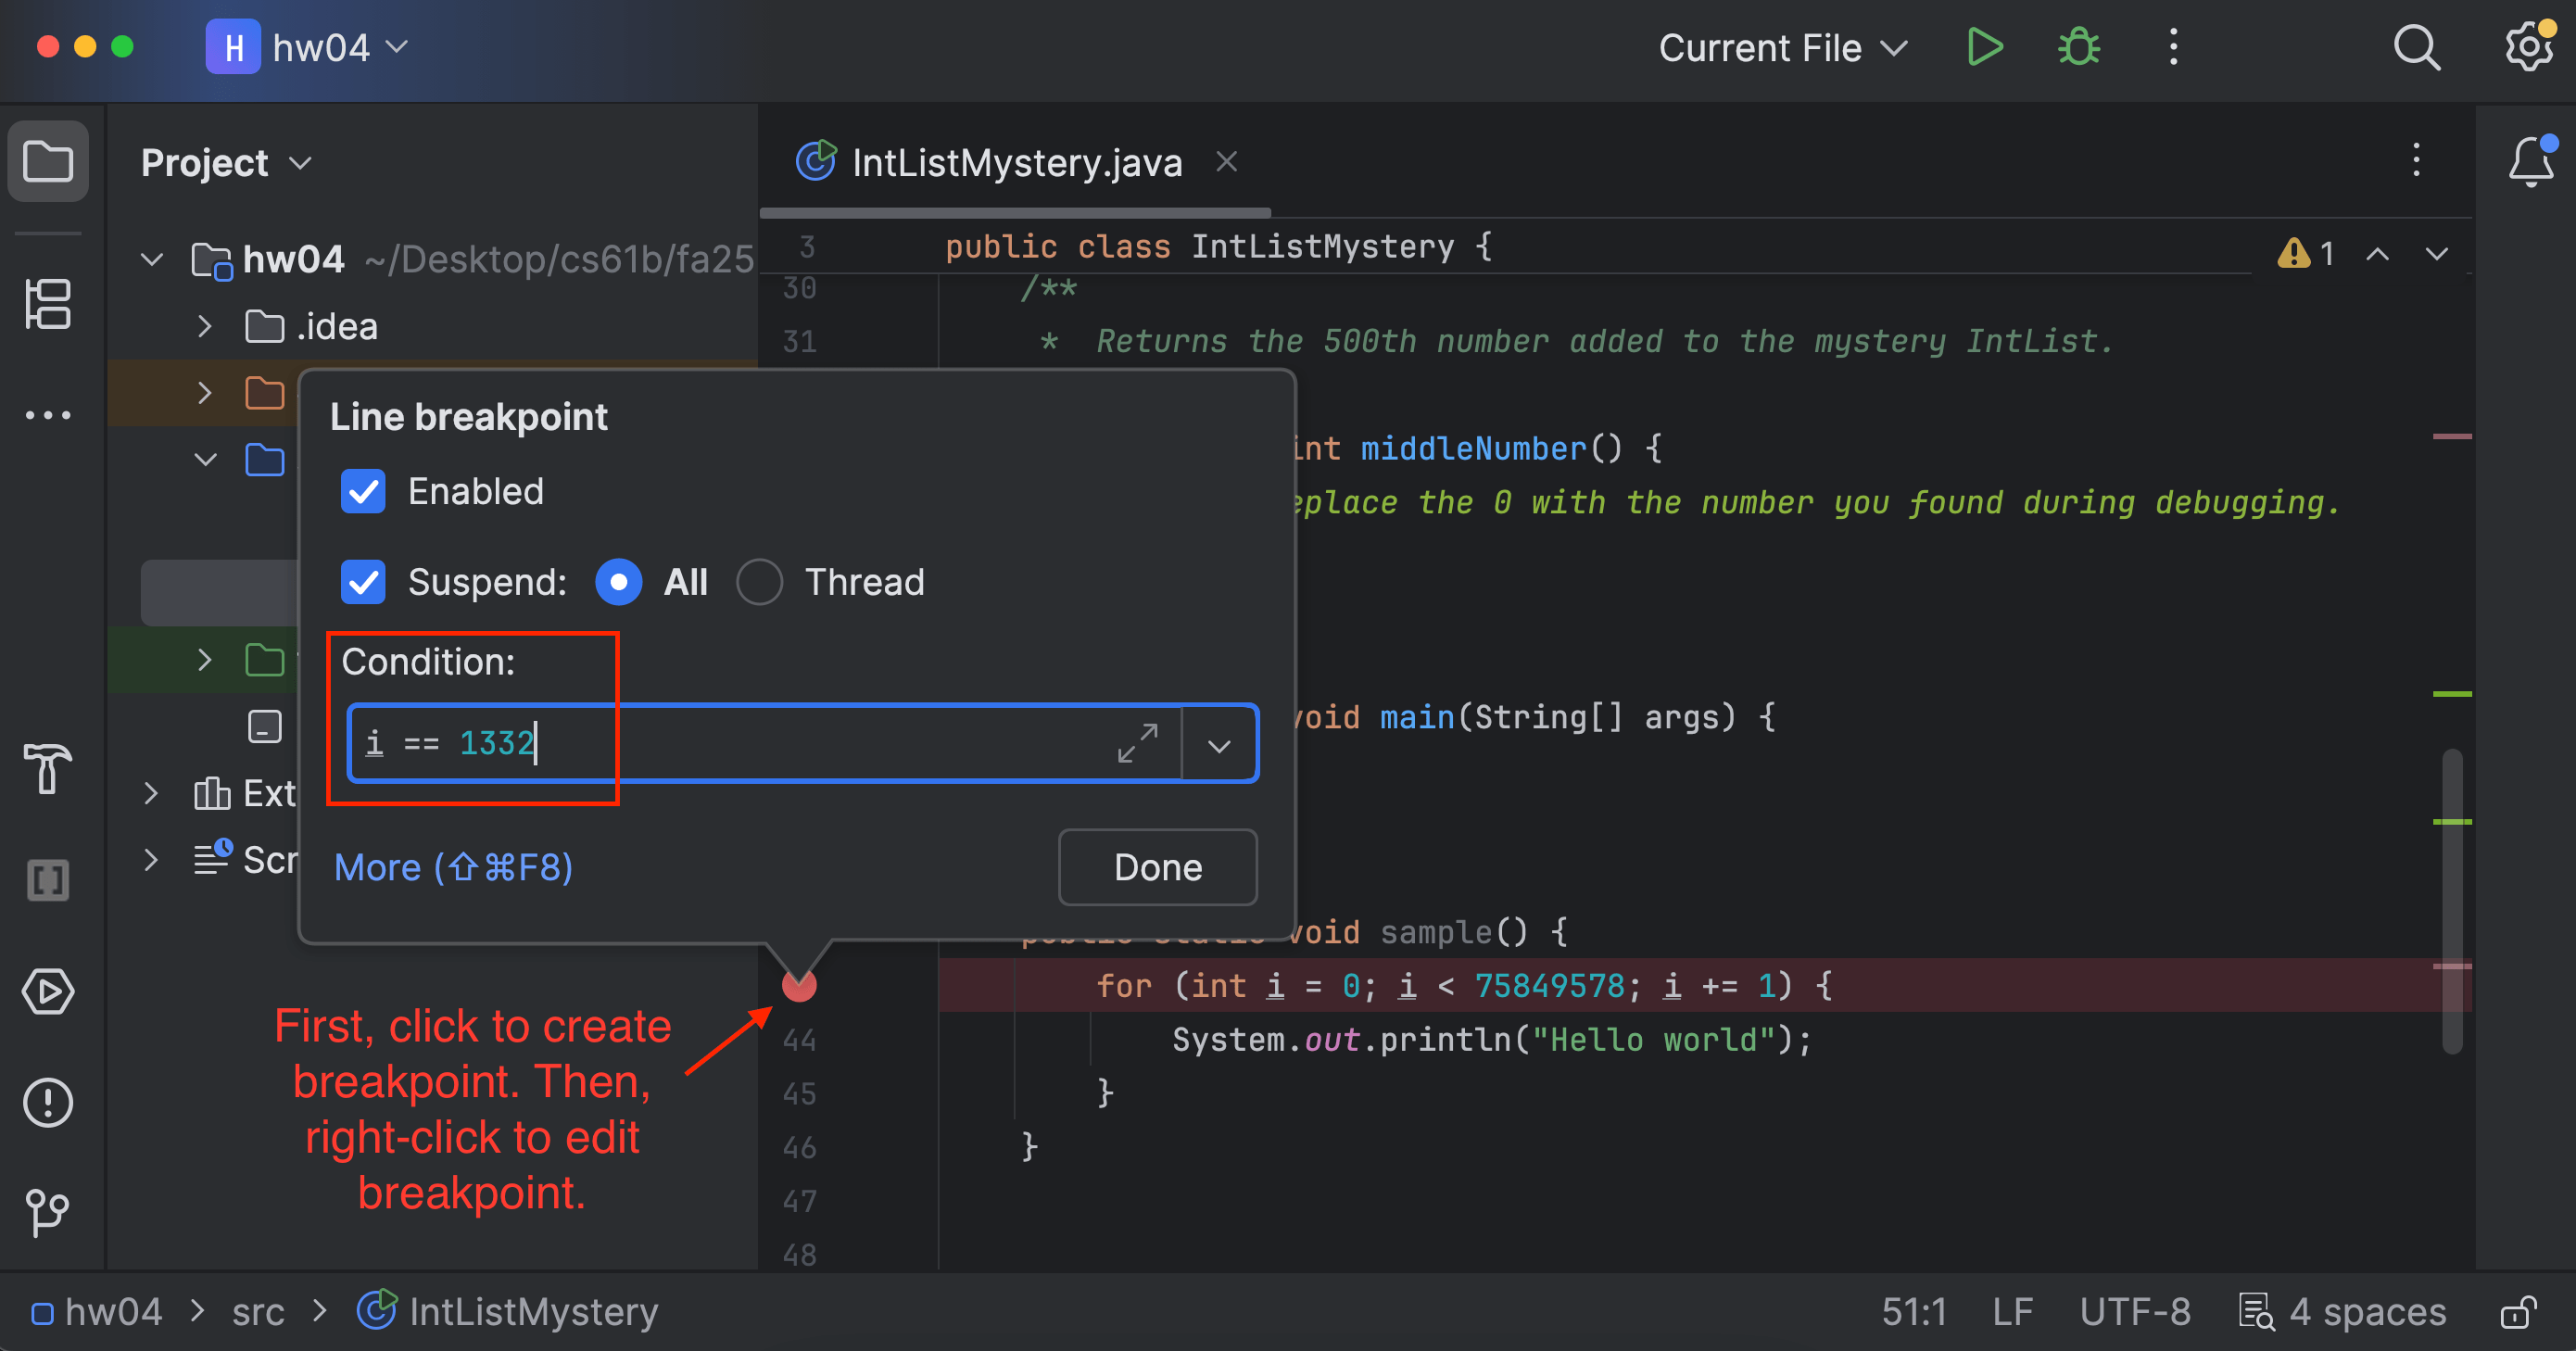
Use a conditional breakpoint to figure out the 500th number added to the mystery IntList. Then, write the number in the middleNumber method.
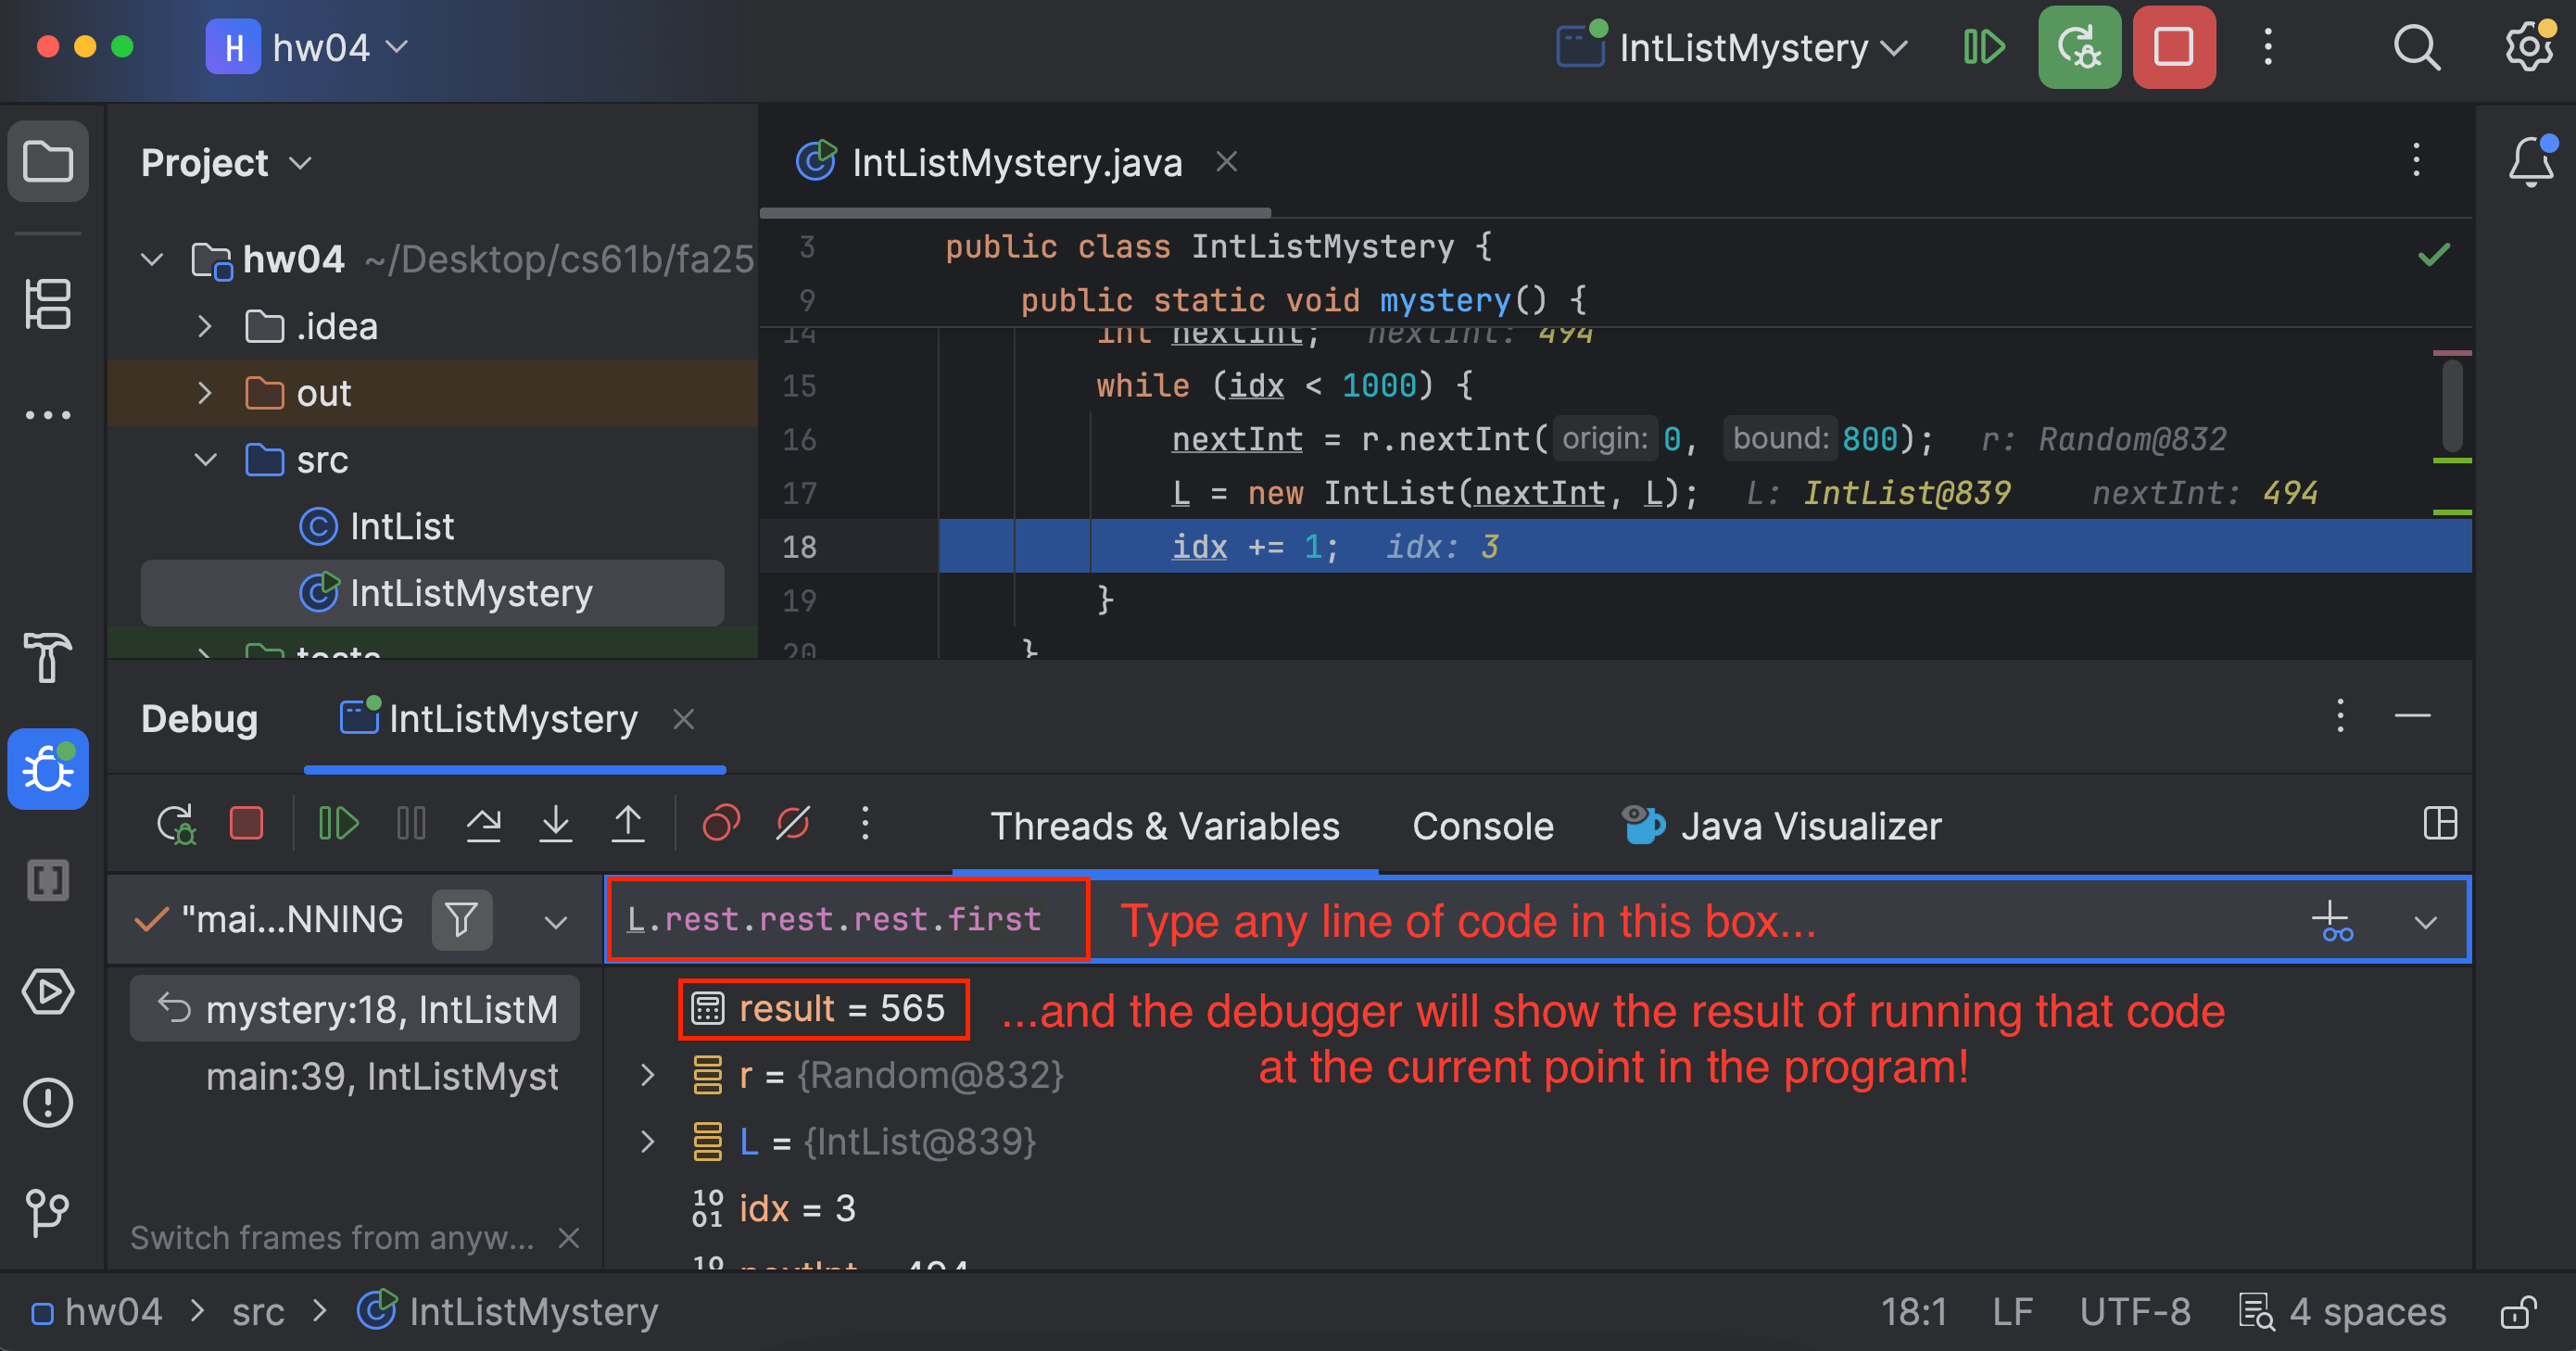
Hint: The list should have 499 elements just before adding this number, and 500 elements just after adding this number. You can the debugger has an “Evaluate Expression” tool that you can use to type a line of code and see the result. For example, you could type L.iterativeSize() in the box to see the current size of the IntList!
Submission
Graded files that you need to modify:
IntList.javaIntListMystery.java
Follow the Assignment Workflow Guide to submit. You can submit as many times as you want. The score you see on Gradescope is your final score for this homework.