Homework 4: CBTF Practice
This homework will cover everything you need to know about testing in the Computer-Based Testing Facility (CBTF). You’ll practice using the PrairieLearn platform, on which you’ll be taking your Midterm 1 exam.
We highly recommend reading through this carefully, as doing so will help ensure you have a smooth test-taking experience and are aware of all the CBTF and CS 61B specific policies in place.
CBTF Policies
If you haven’t already, please make sure to look through RTL’s CBTF page to understand CBTF’s policies and procedures (TL;DR provided below), and look through the Getting Started for Students page to understand what tasks need to be done on your side before taking Midterm 1.
- You are not allowed to use any unauthorized devices during your exam (smart phones, smart watches, etc.).
- Proctors will be monitoring the CBTF and will report any instances of Academic Dishonesty to course staff directly️.
- CBTF Proctors can not answer any content related questions during your exam.
- Make sure to arrive 10 minutes before your scheduled session to get checked in on time. As a heads up, exams start right at listed session time (not BERKELEYTIME).
Task 0: Setup
- Complete Tasks 1 and 2 on the Getting Started for Students page.
- Find the CS 61B course on PraireLearn and open the HW4 assignment.
- Read the pledge and begin the assignment.
When taking the midterm, you’ll be asked to certify a similar pledge.
If you’re having trouble reading some images, you can either “pinch” into the screen to zoom in or click on the image, which will enlarge and open it in a new window.
Task 1: LLD Count
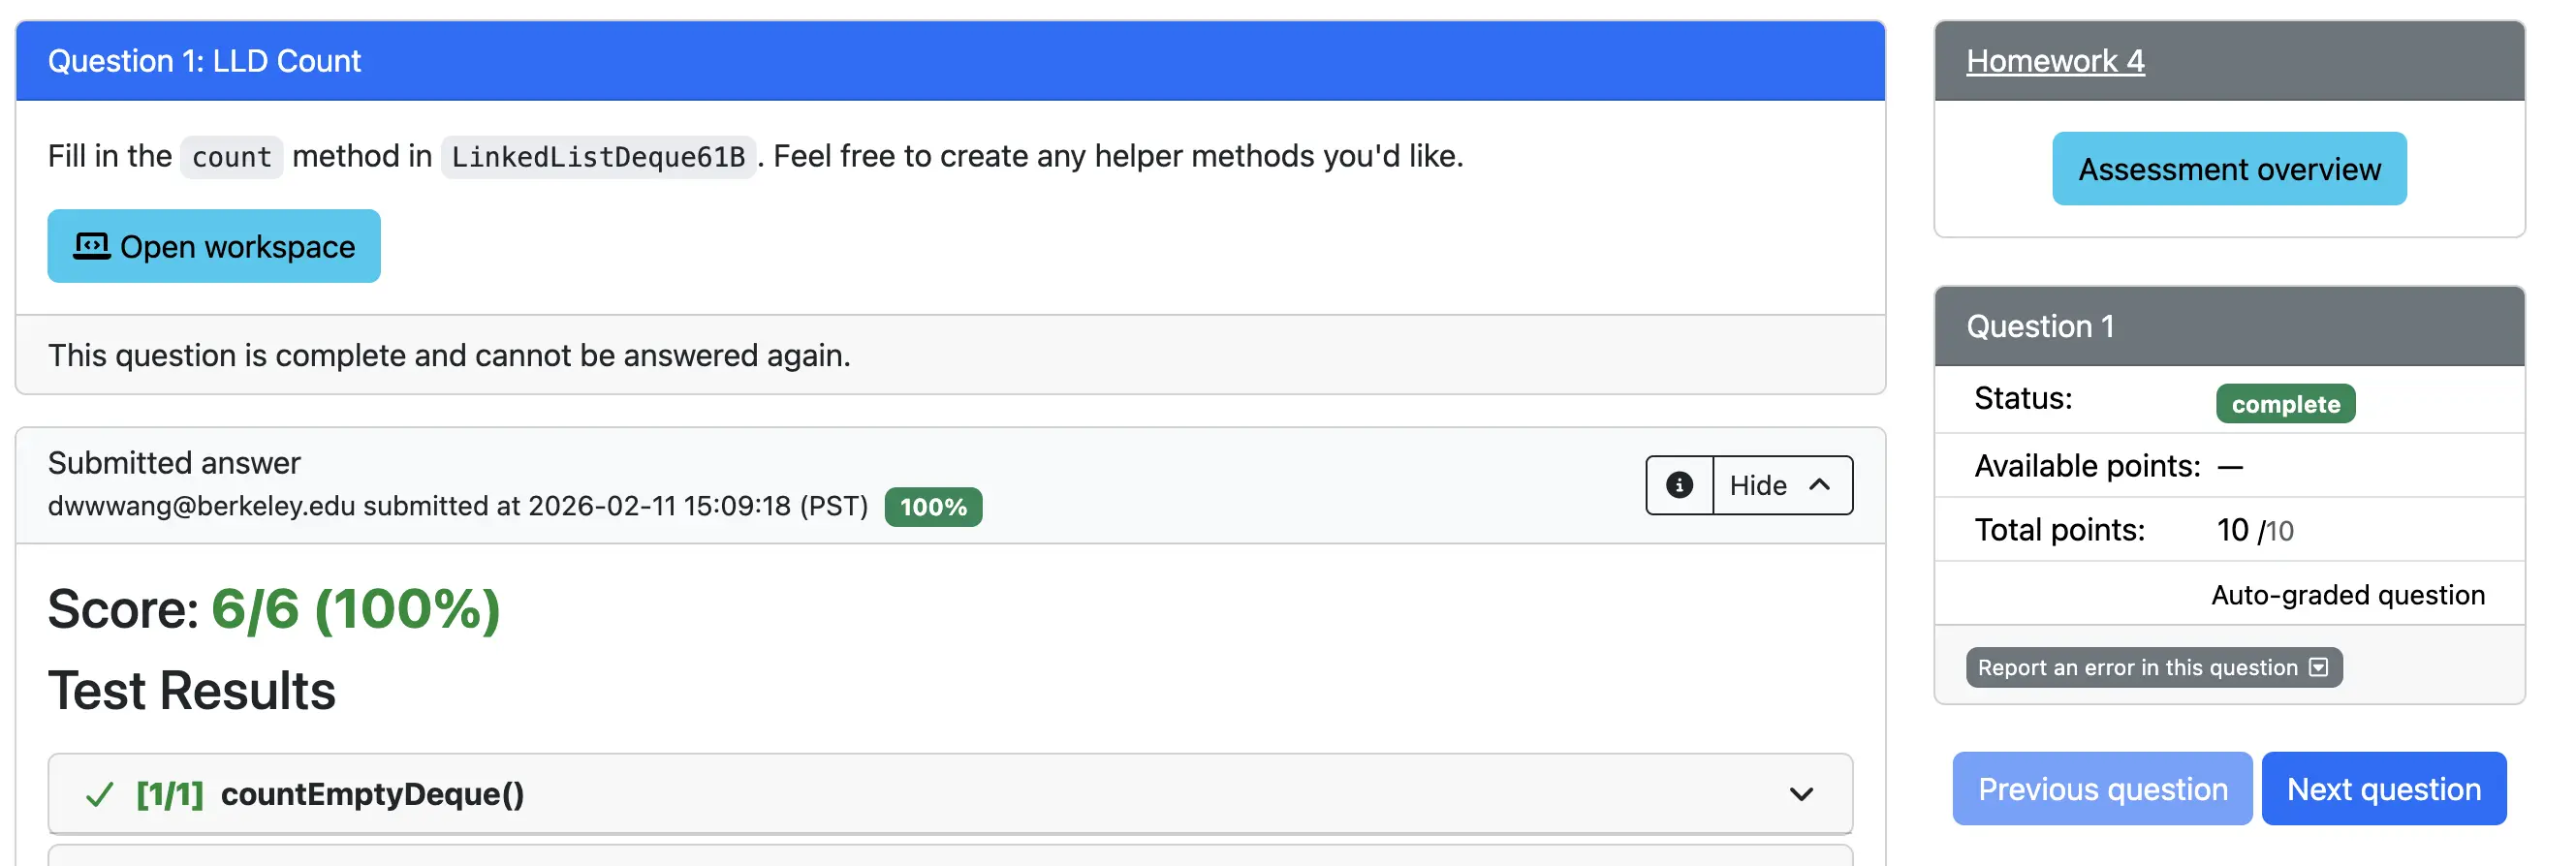
Click on the first question, LLD Count, which will lead you to the page below.
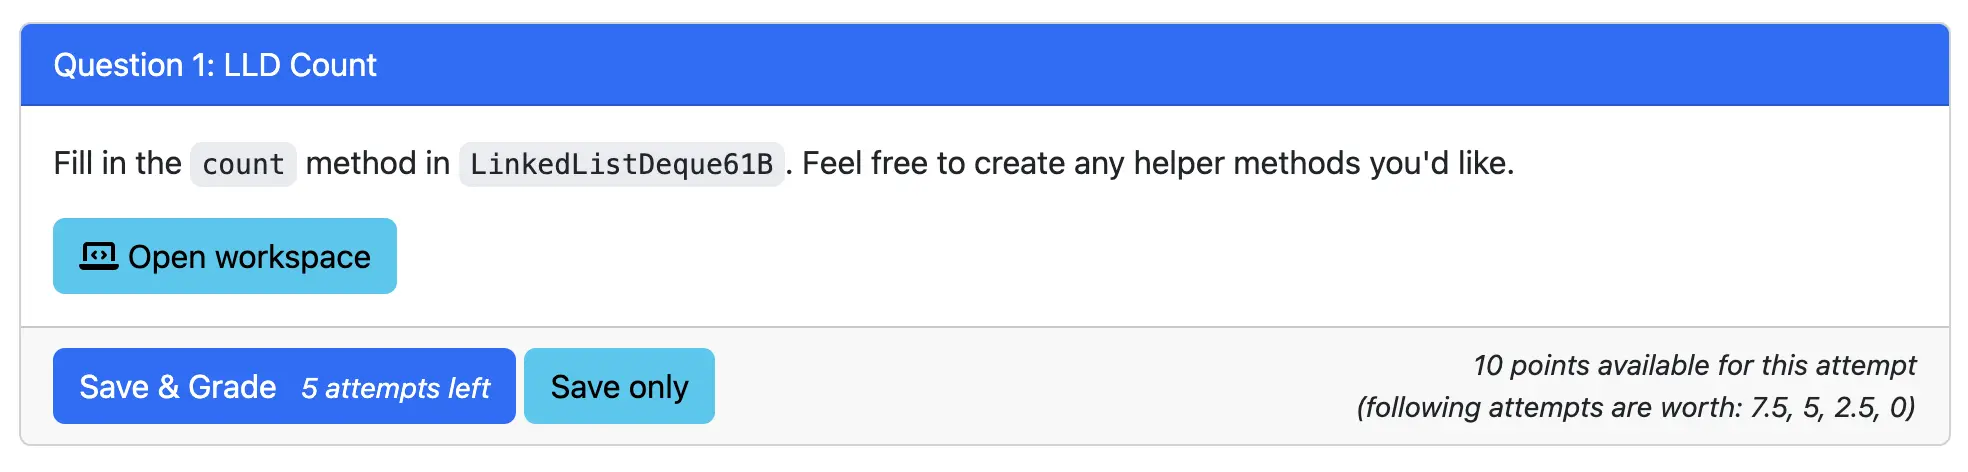
Open Workspace
This will lead you to the coding interface where you will complete the question. A new window will open as a Visual Studio (VS) Code virtual machine instance. If you’ve never used VS Code before, it is another popular IDE used for coding. It mostly has the same functionalities that IntelliJ has including a workspace, debugger, and terminal. We’ve included a VS Code Guide below as well.
Take note of the following (also shown when clicking the ? in the upper right corner):
- Auto Save: Auto save will be enabled by default. You can see this in
File > Auto Savein the upper left corner. You should not change this. - Reload: Reloading the page will not cause you to lose your work if you have auto save enabled.
- Reboot: Clicking the reboot button will restart the instance and will also not cause you to lose your work. You should not need to press this unless asked to.
- Reset: Clicking the reset button will delete all your work and reset the instance to its original state. You should not need to press this unless asked to.
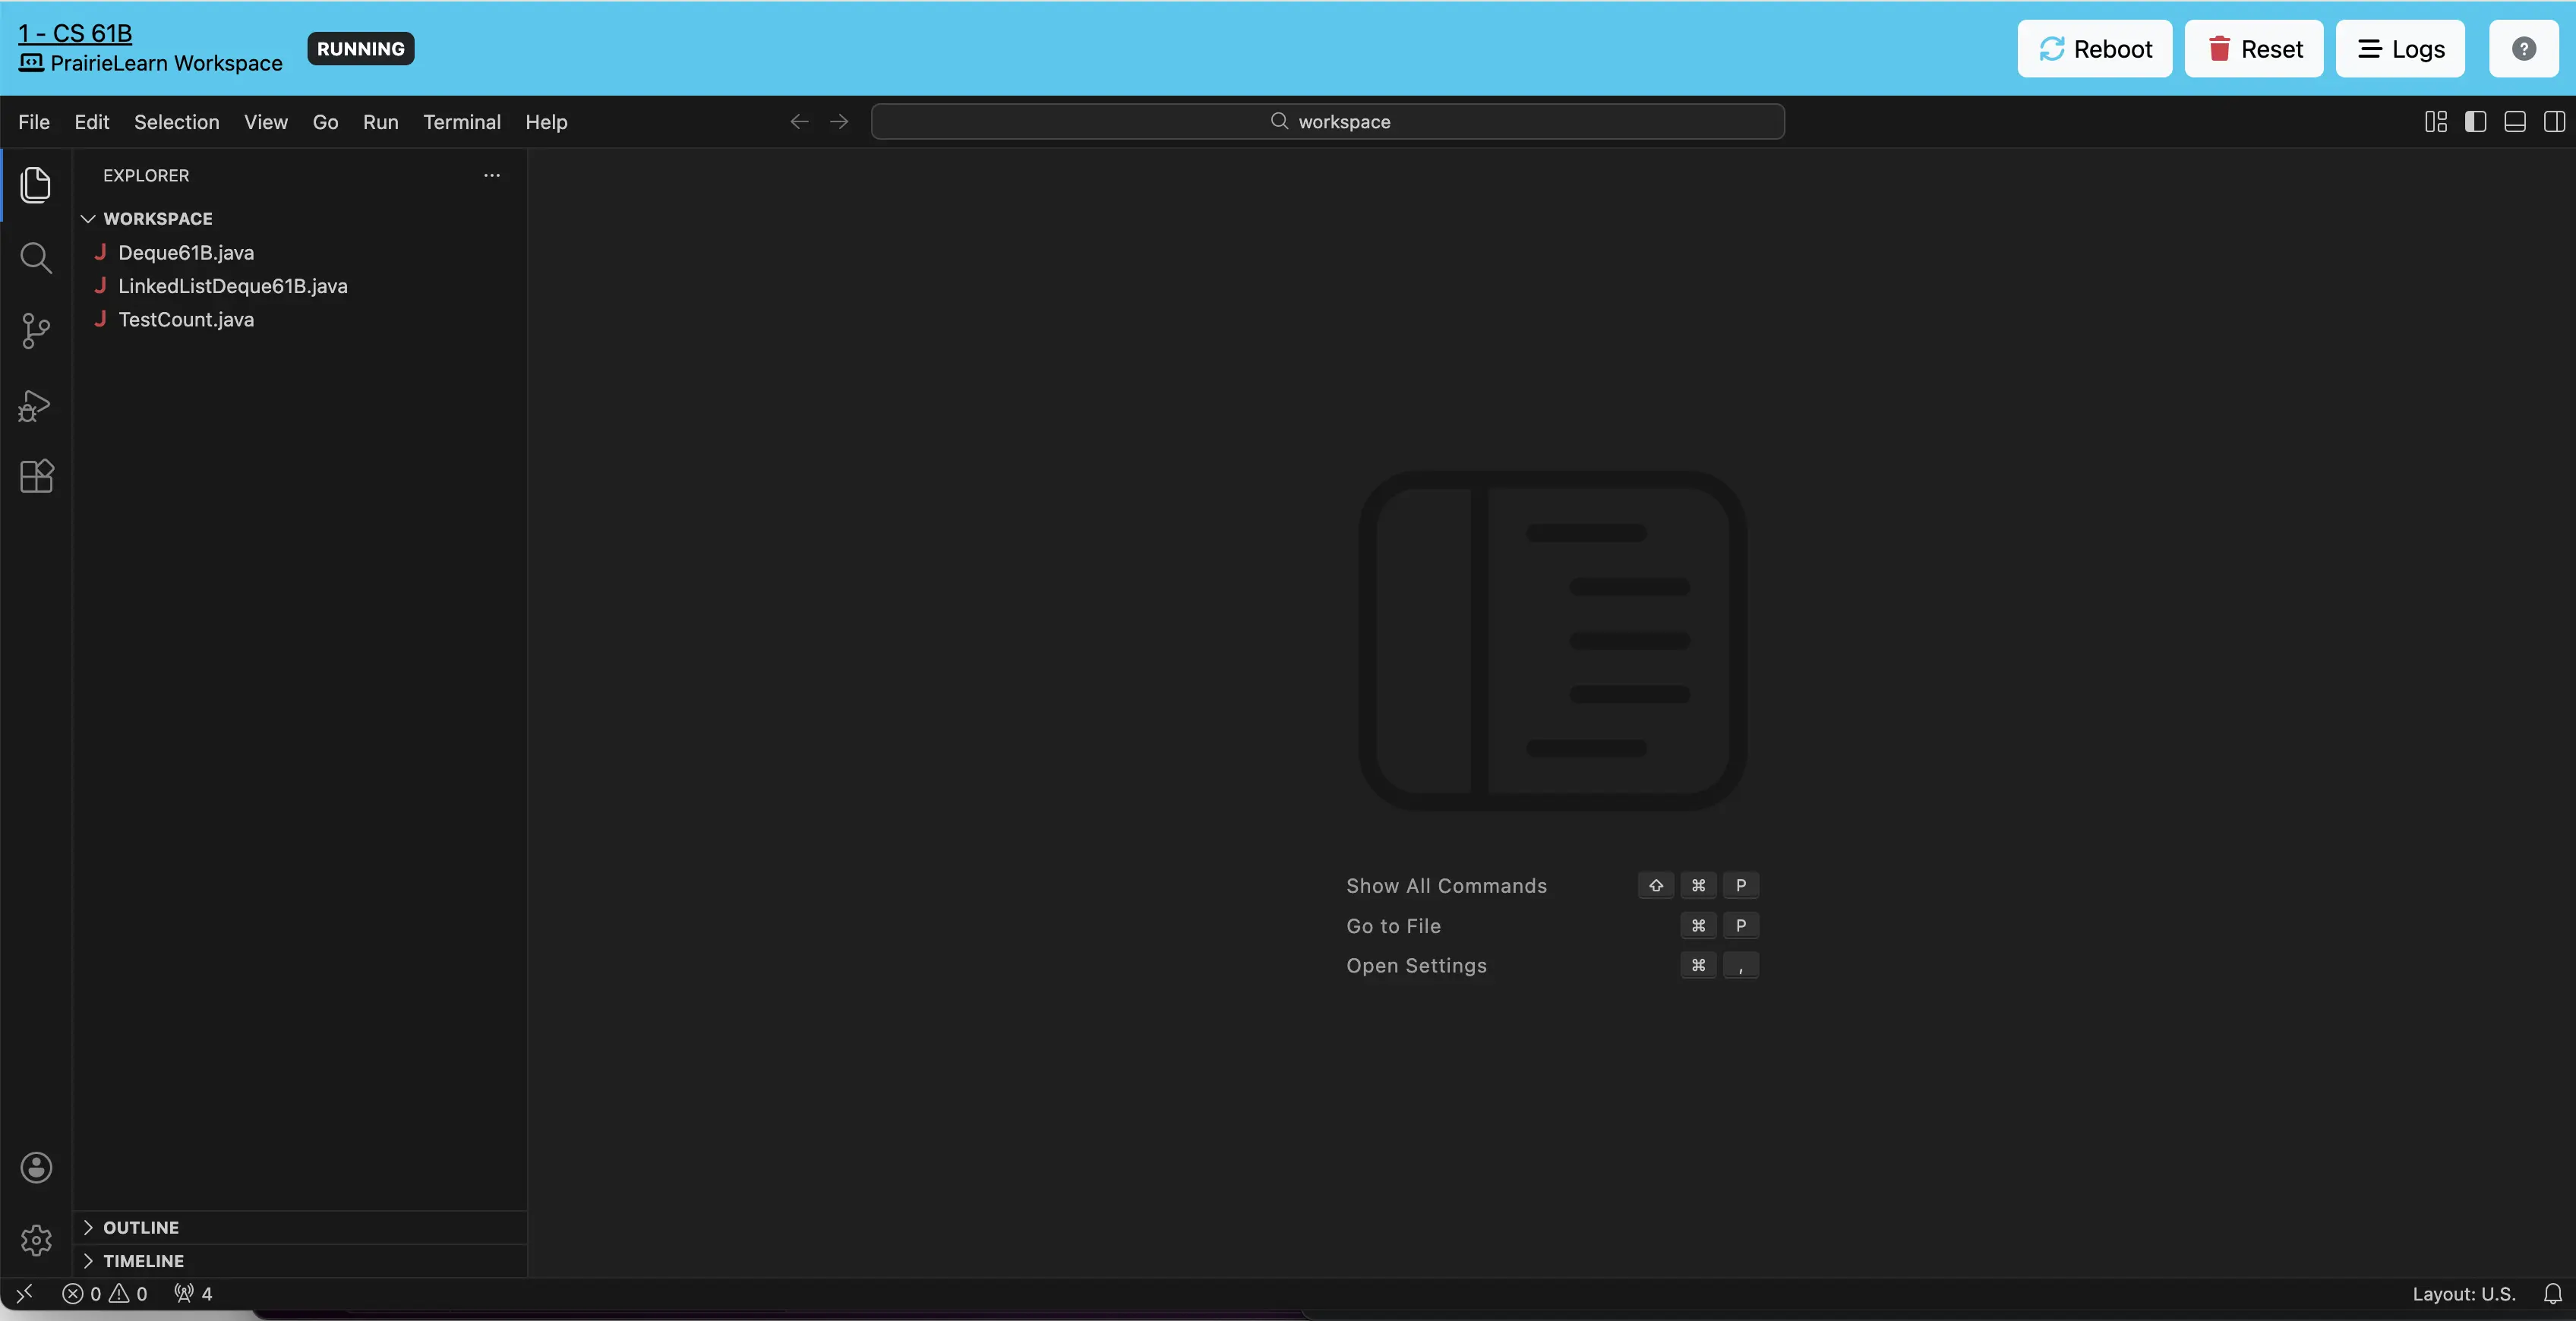
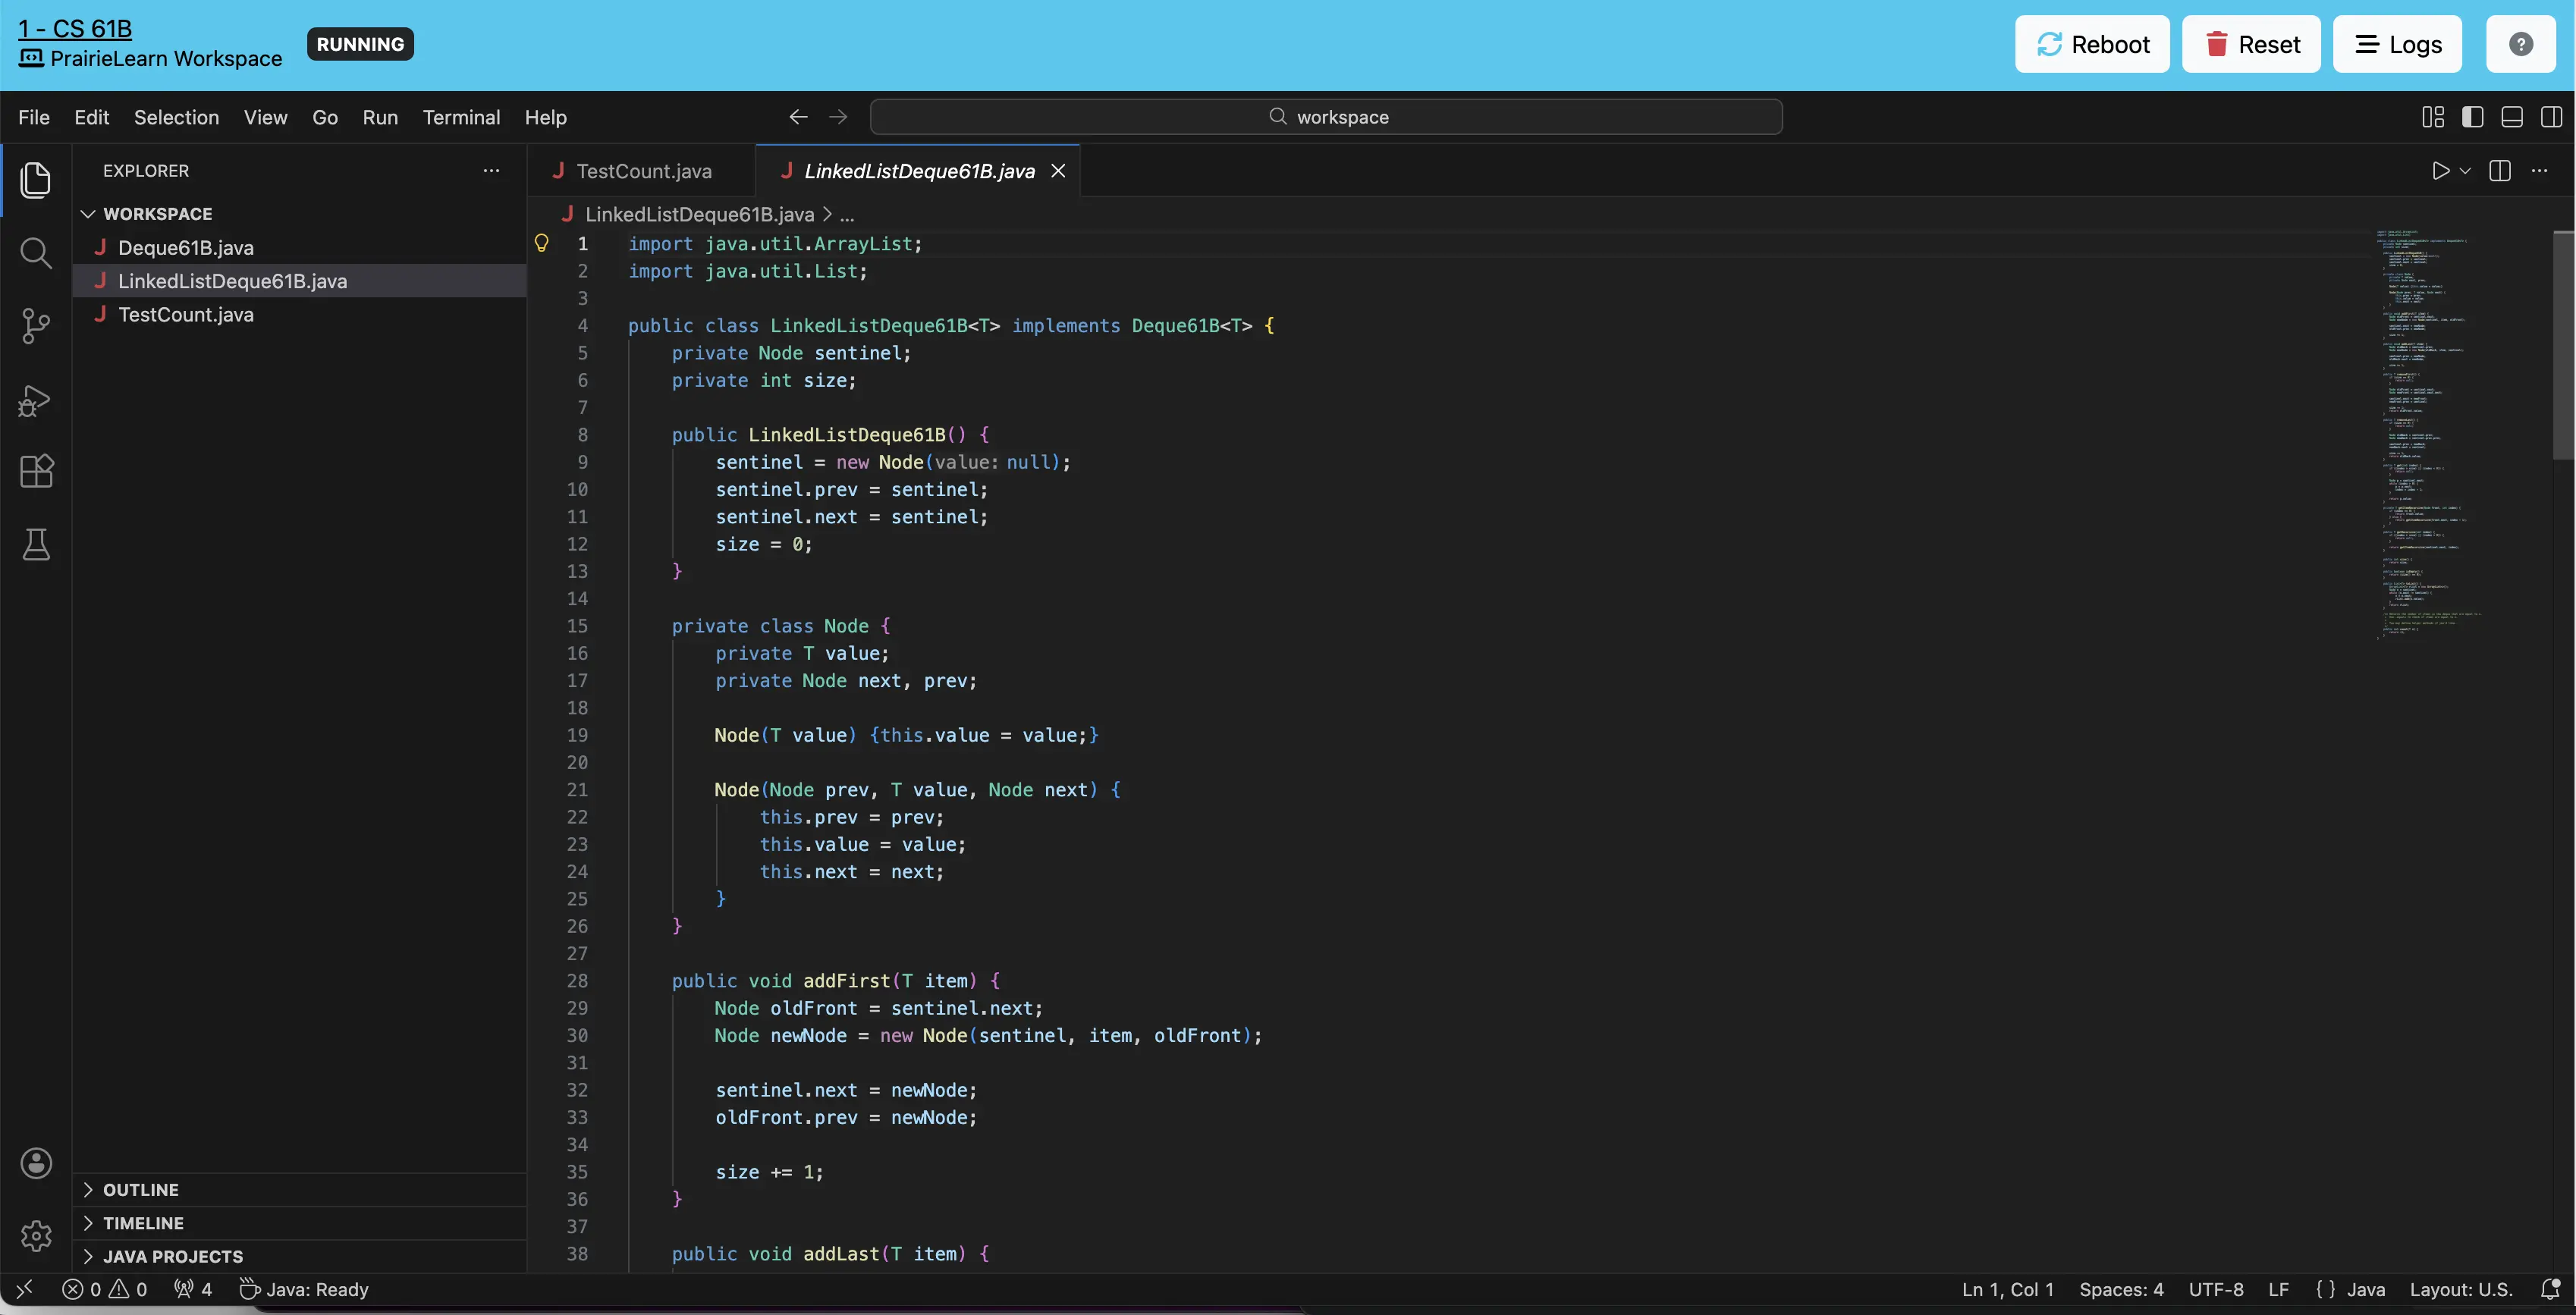
Double-click on the LinkedListDeque61B.java file as well as the TestCount.java file. Try running the TestCount.java file by clicking either the green play button next to public class TestCount or public void testCount(), both will run the only test in the file. You should see the test fail, as well as an output in TEST RESULTS. Clicking the now red X’s will run the test again. Here, you’ll be able to see the results of running your local tests.
You can ignore any lines in
TEST RESULTSbeginning with a percent sign%. Those are produced by the virtual machine instance. Instead, you should focus on the lines withexpected:andbut was:, as well as the stack trace (lines beginning withat).Additionally, you might have also noticed a play button (albeit not green) in the upper right. This will not do anything.
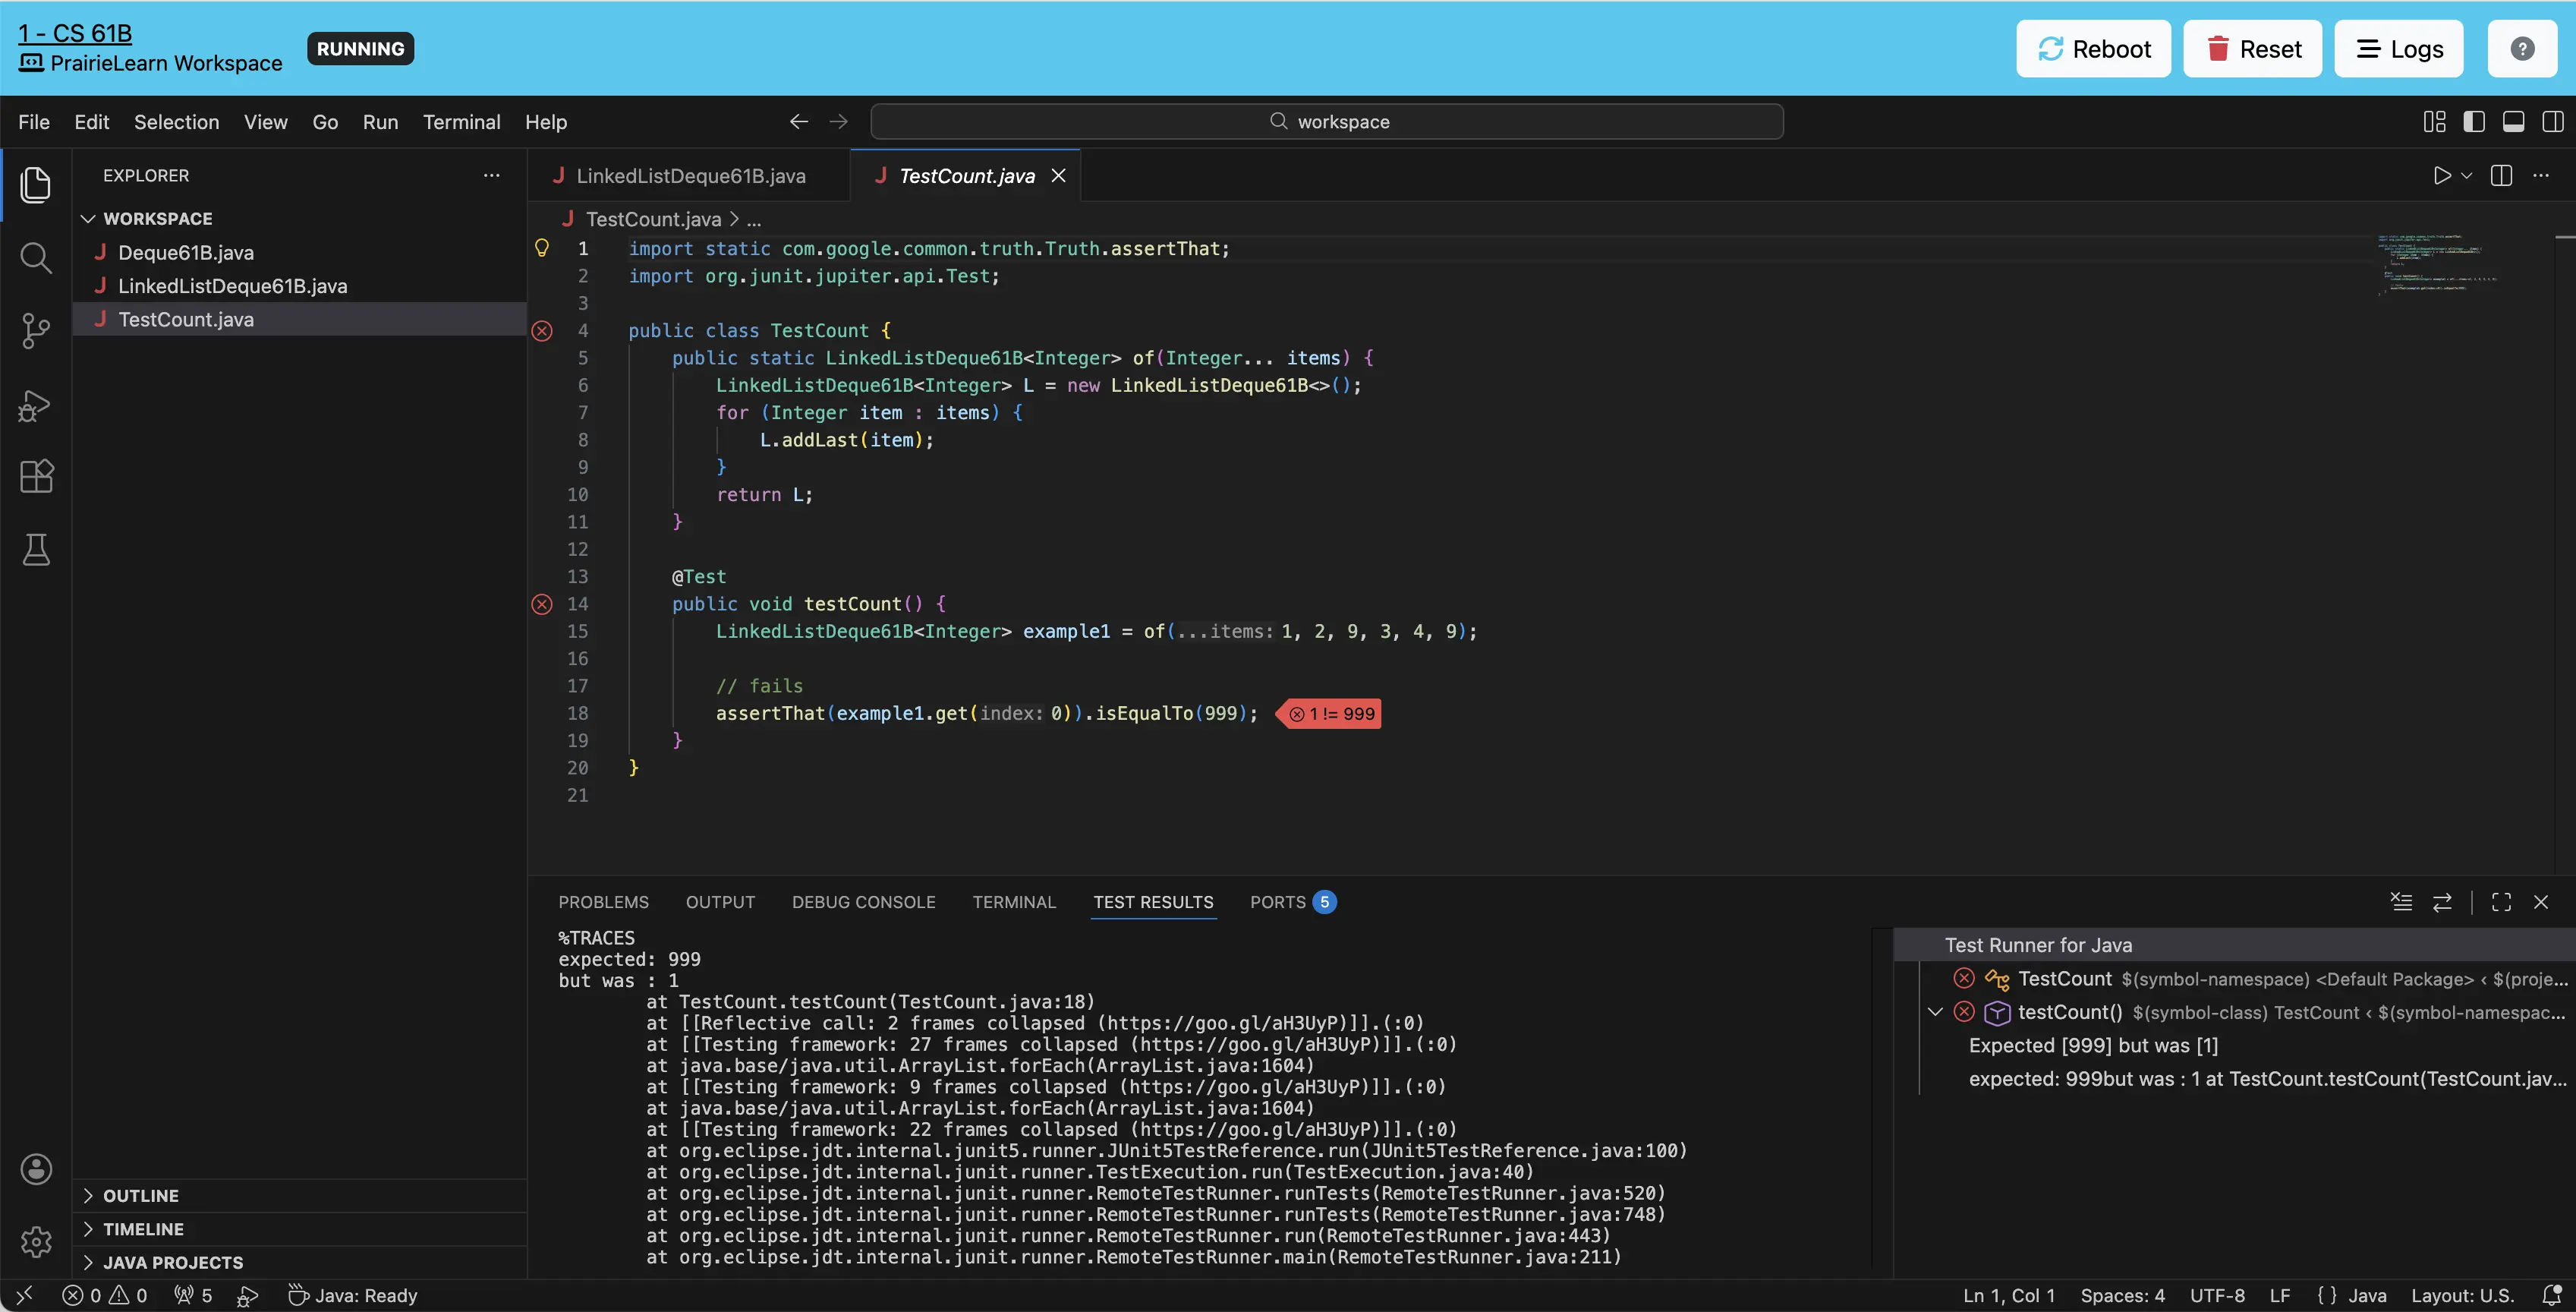
Now, you should be able to code inside both TestCount.java and LinkedListDeque61B.java by directly typing into each file.
Familiarize yourself with the question interface on PraireLearn and complete LLD Count.
Generally, for each question—including when taking the midterm—you should do the following:
- Write your own local tests
- Code your implementation
- Test your implementation
By writing your own tests, you simultaneously check your understanding of the question as well as provide a way for you to verify your implementation locally.
Before submitting your code for this question, please read the rest of the task below until Scoring for this Assignment.
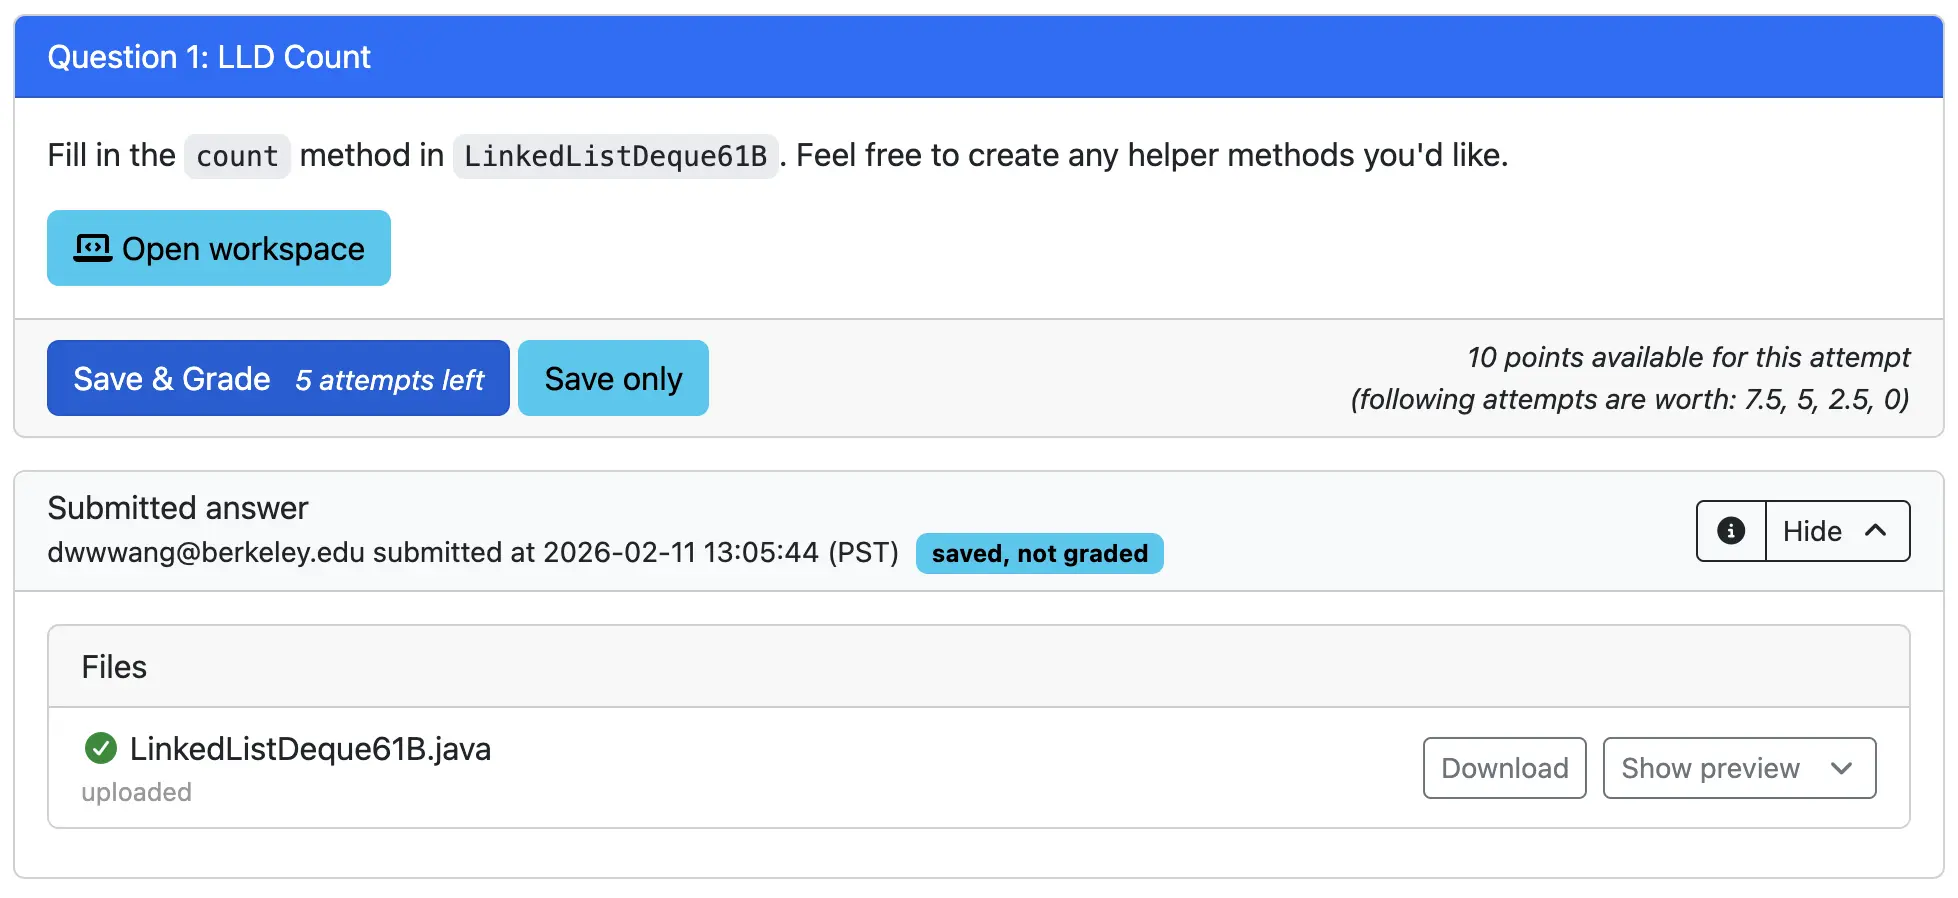
Save & Grade
This will submit your code and run it against our test suite or autograder, grading it.
Your first graded submission will not deduct any points, however each subsequent attempt will decrease your maximum possible score by 25% of how many points you miss.
Again, we highly recommend testing your code locally by using the test file and writing your own tests.
This is to encourage you to test your own code before submitting, because outside of this course and in the real world you won’t always be given tests that check your code.
Below is an excerpt describing how the scoring scheme works. You do not need to know how this works, and instead can just read the TL;DR at the bottom of this note.
Formula
\[m_{k+1} = m_k - [(100 - x_k) * 0.25)], \quad m_1 = 100.\]Here, $k$ refers to the submission number (e.g. your first submission is submission 1 or $k = 1$), $x_k$ refers to the maximum score of your first $k$ submissions, and $m_k$ refers to the maximum possible score of your $k$th submission. All of these are in percentages.
Example 1: if you submitted two total graded submissions with your first submission scoring $x_1 = 50\%$, then the maximum possible score $m_2$ you would be able to get on the second submission is:
\[m_2 = 100\% - [(100\% - 50\%) * 0.25] = 87.5\%.\]Example 2: If you submitted two total graded submissions with your first submission scoring $x_1 = 95\%$, then the maximum possible score $m_2$ you would be able to get on the second submission is:
\[m_2 = 100\% - [(100\% - 95\%) * 0.25] = 98.75\%\]Expanding on this example, if your second submission scores $x_2 = 95\%$ again, then the maximum possible score $m_3$ you would be able to get on the third submission is:
\[m_3 = 98.75\% - [(100\% - 95\%) * 0.25] = 97.5\%\]Finally, if your third submission scores $x_3 = 100\%$, then your final score is simply $m_3 = 97.5\%$, as that is the maximum possible score you can get on your third submission.
Since your maximum possible score scales based on how many points you miss each submission, higher scoring submissions will cause your maximum possible score to decrease less.
TL;DR
Try to score as high as you can on each submission.
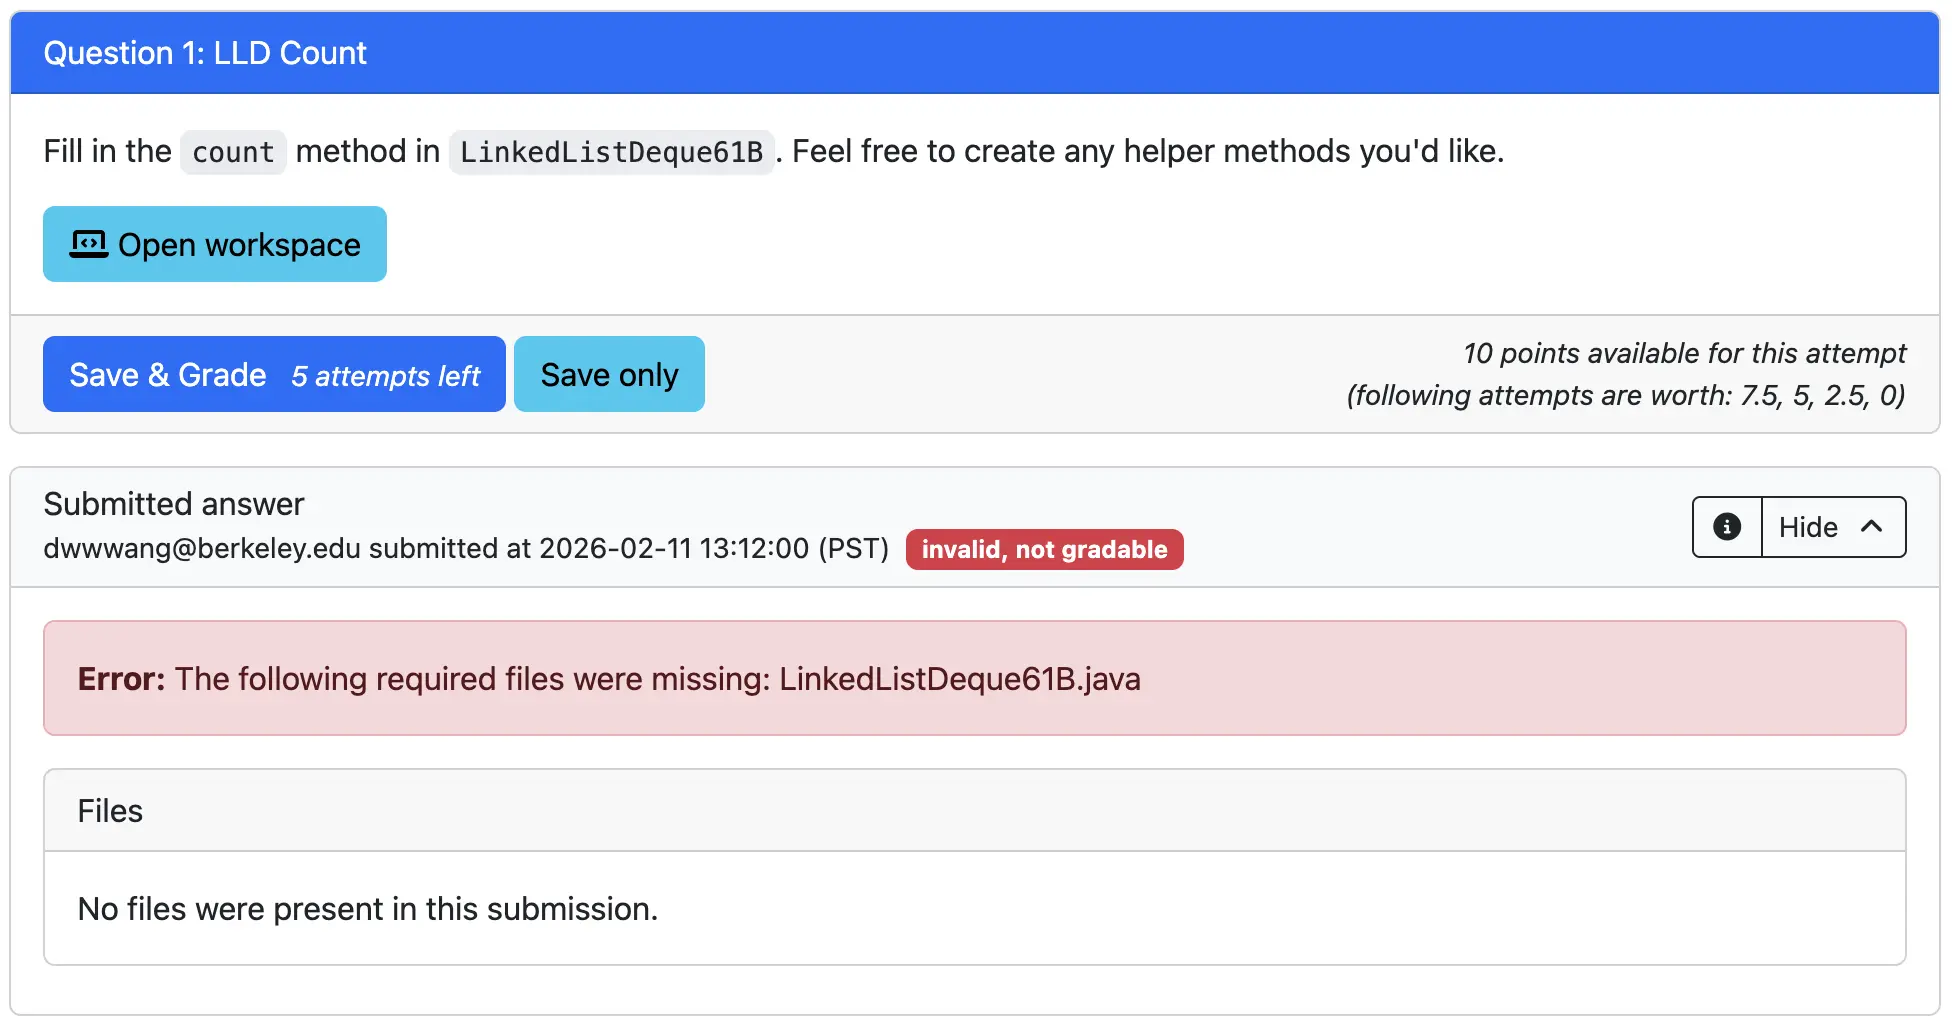
If you submit your code for grading prior to opening your workspace, it will not count as a graded submission and show the following error page. This can also happen if there are compilation errors in your own code or when running the autograder tests. If this happens, fix them and try again.
Upon successful submission, you will see your submission being graded. Once the autograder has completed grading it, you will see your score for this question. If you receive a full score, you will not be allowed to make any further submissions for that question.
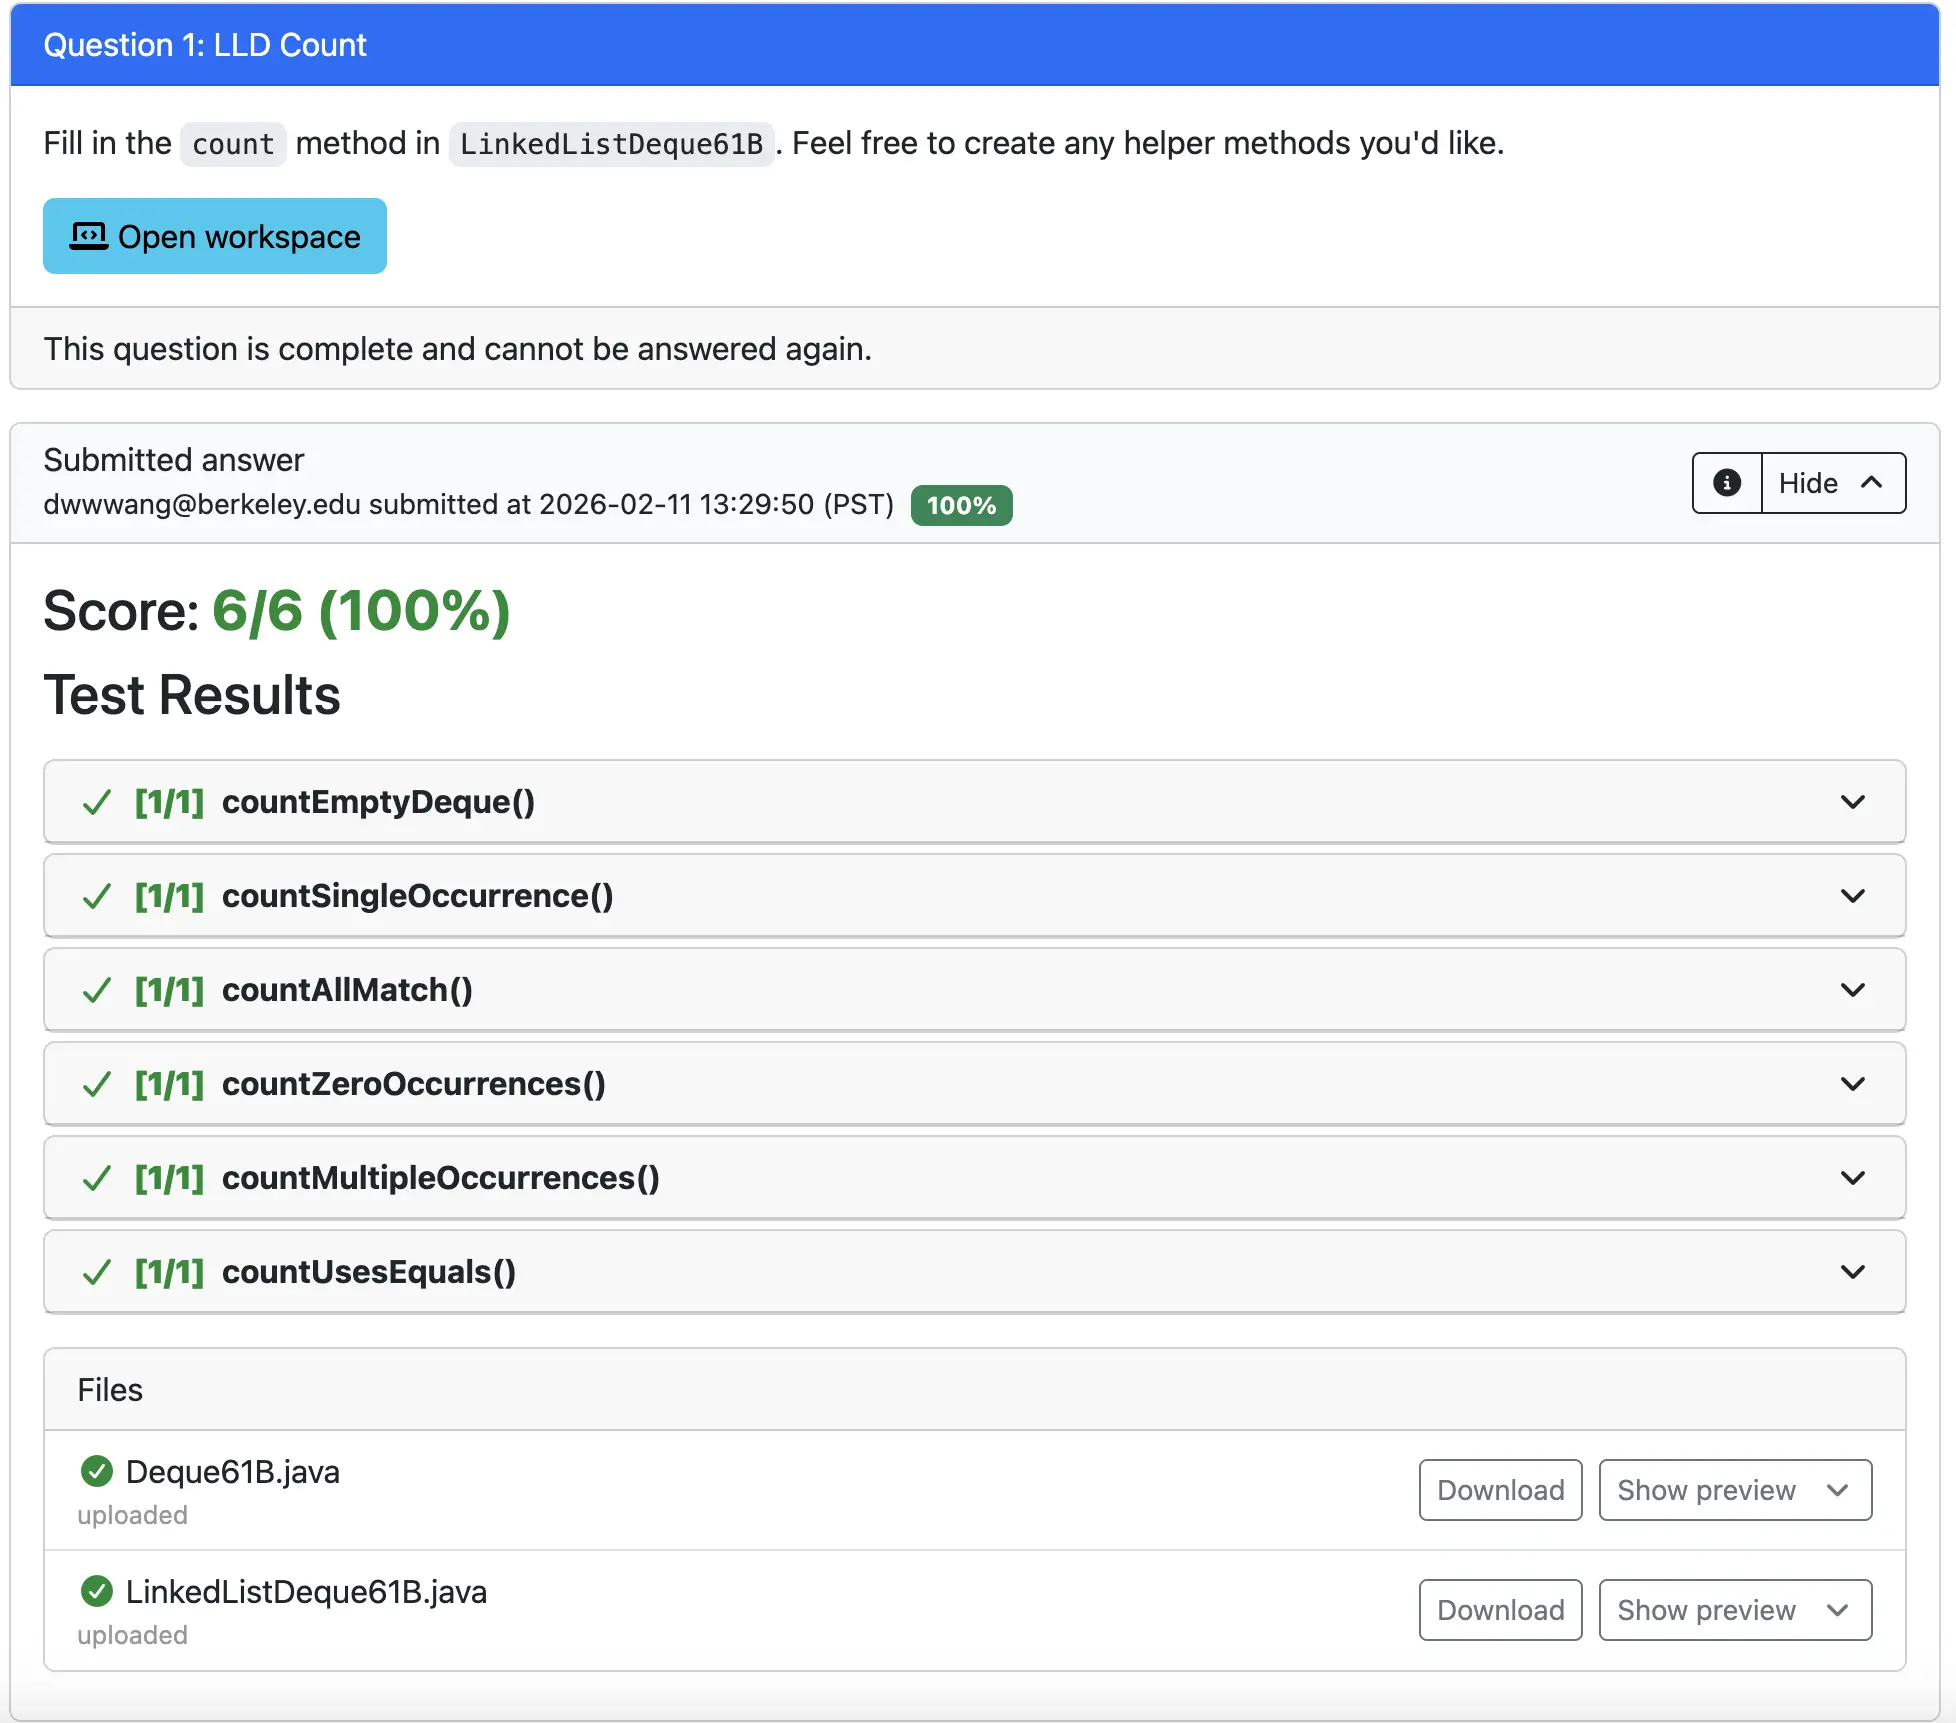
The tests we grade your code on are hidden tests, meaning you will not be able to see the content of the tests. The midterm will also use hidden tests.
Again, this is to encourage to write your own local tests, as well as to ensure you are not hardcoding your code to the test suite. However, note that completely passing local tests does not guarantee that you will get a full score on the hidden tests.
If you do not receive a full score, you will see which tests you failed as well as your partial score. Sometimes, the names of the tests can be helpful in describing the case that your code did not pass, however this will not always be the case.
In the example below, we used == instead of .equals when comparing each element and checking for equality, causing us to fail the countUsesEqual() test and get a score of 83.33%. If you submit the assignment or assessment as is, this would be your final score.
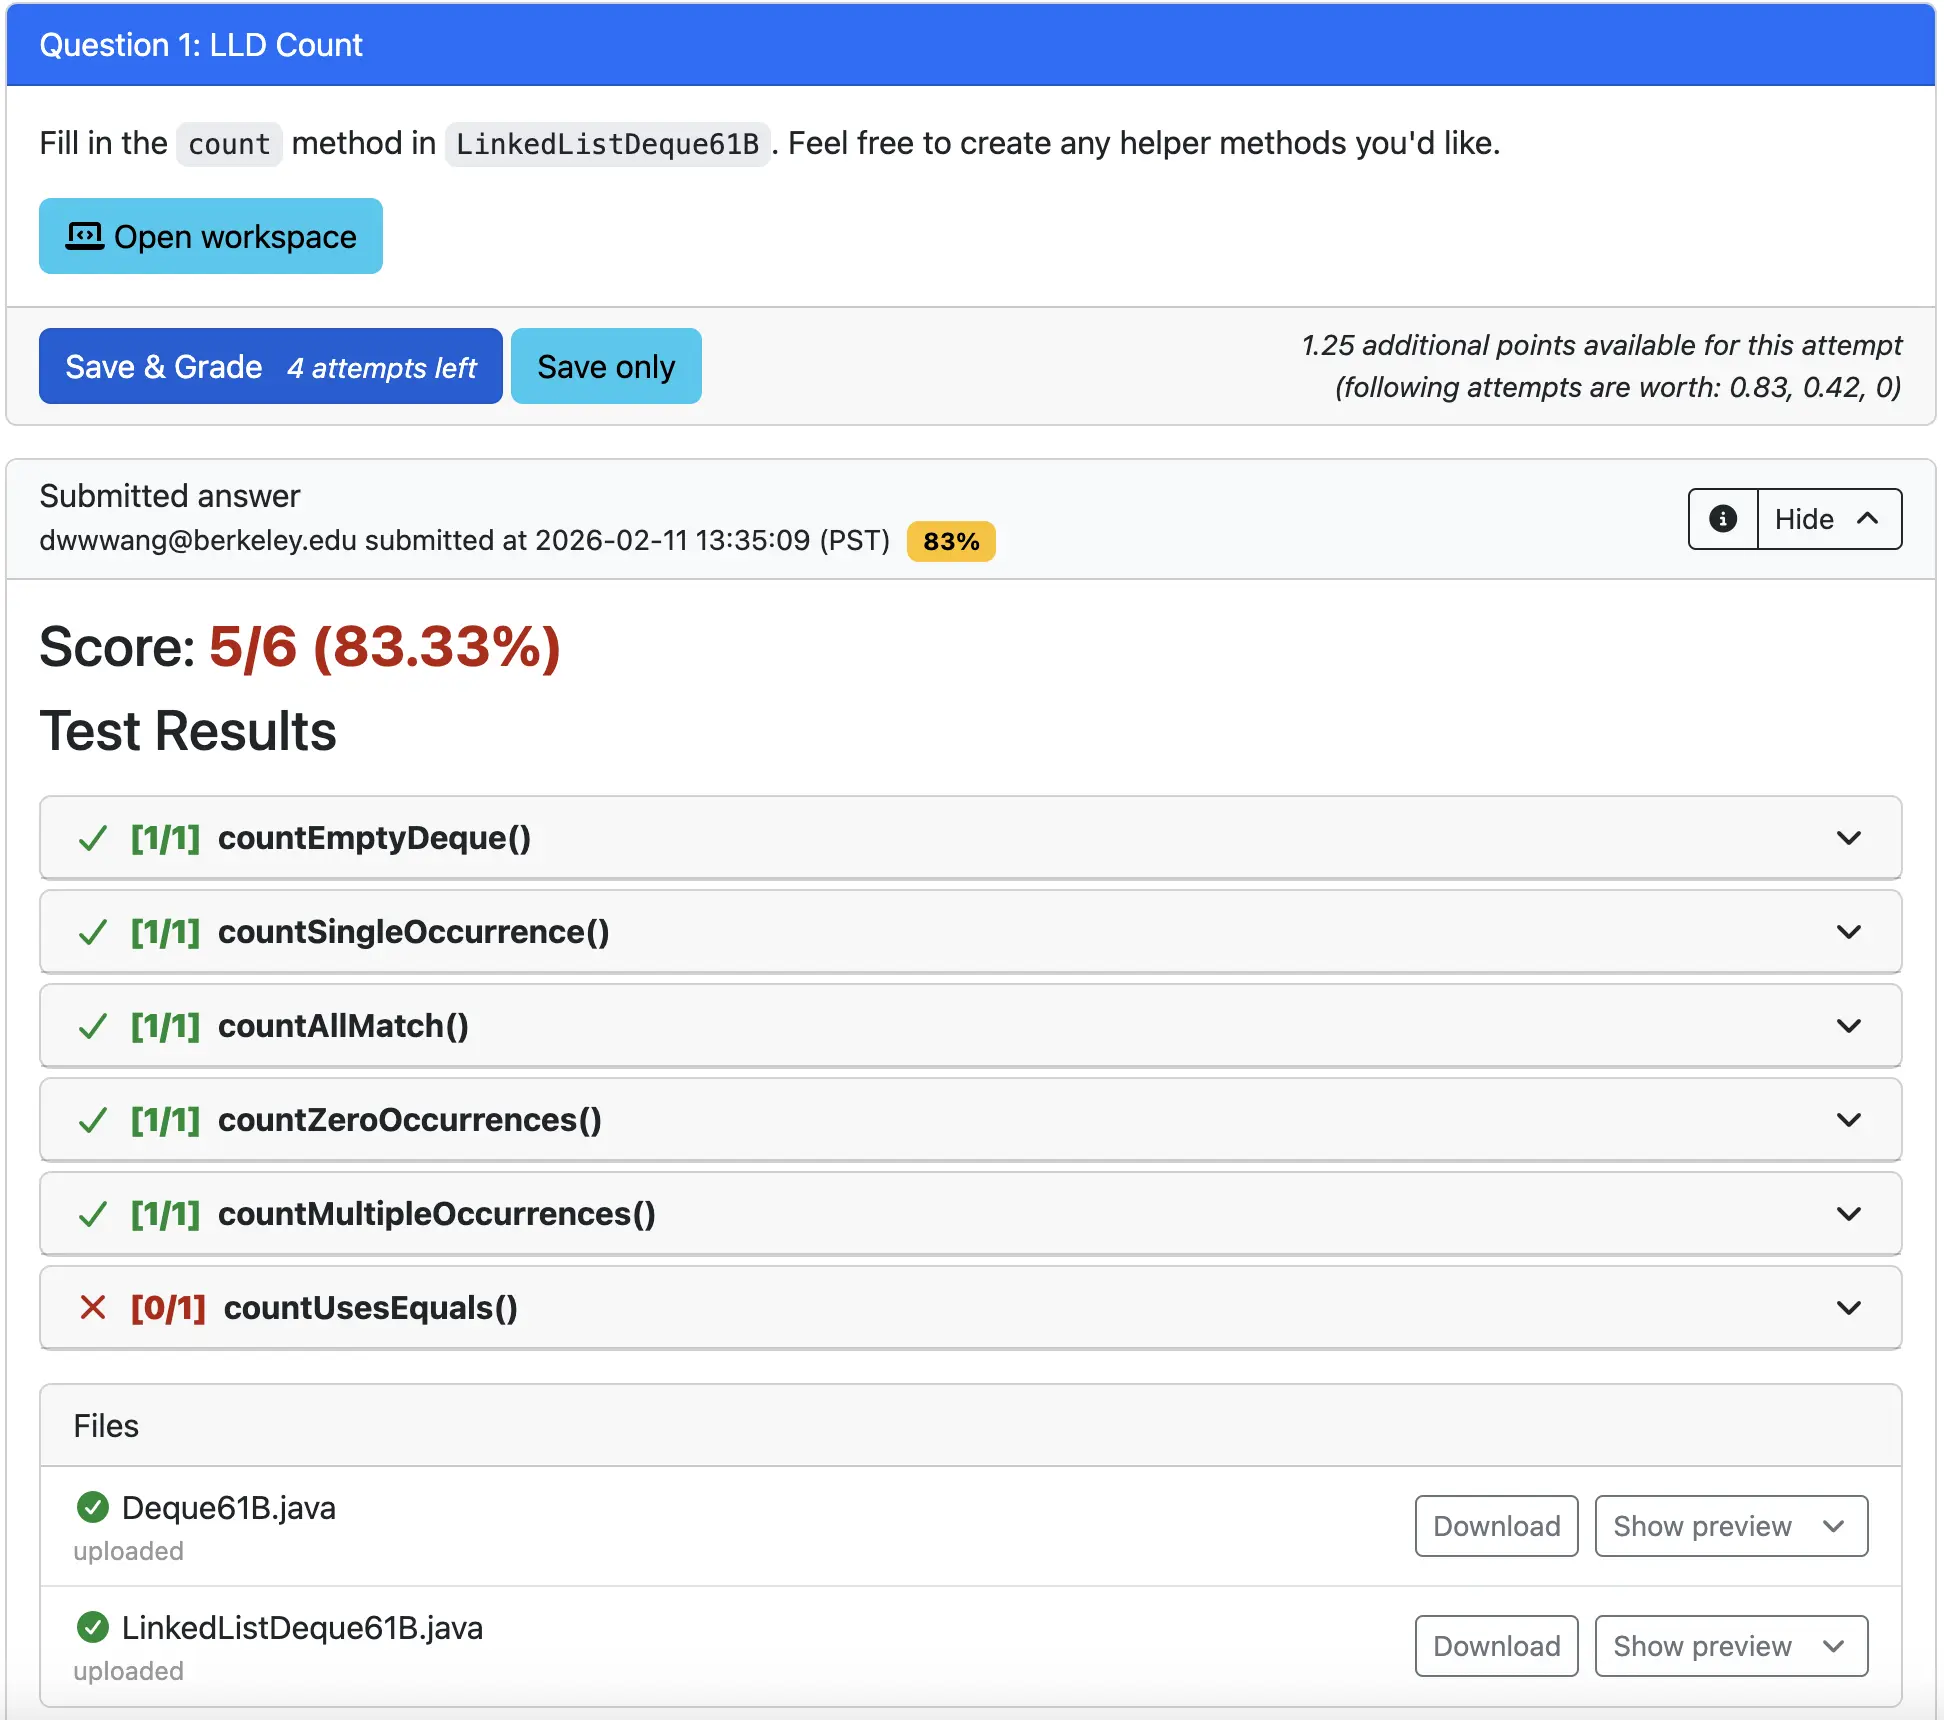
Realizing our mistake, we go back into the code, change == to be .equals instead, and submit our code again. At this point, our maximum possible score is now the following using the formula from the excerpt above:

Since we scored full points, our score is the current maximum possible score, or $95.8\%$ (rounded).
Now that you’ve completed LLD Count, you can move onto the next question by clicking Next question or by going back to the Assessment overview.
Save Only
This will save your code as a submission that is not graded. Only saving will not deduct any points. Upon doing so, you will see a Download option and Show preview toggle. You should not need to press the Download option unless asked to. You can click the Show preview toggle to see the state of your code when you saved it.
If you’d like to save your code at any given point, you can click this button, but note that this does not submit your code as a graded submission, which you’ll need to in order to complete your assignment or assessment.
Scoring for this Assignment
The scoring scheme shown here will by default be the one used on the midterm unless otherwise specified.
However, for this assignment, your overall score will be scaled by $5$x and capped at $100\%$, such that if your overall score is at least $20\%$ you will get $100\%$.
Task 2: Clip Ends
Complete Clip Ends
Task 3: Map Letter Count
Complete Map Letter Count
Task 4: IntList Double
Complete IntList Double
Submission
Congrats! You now know everything you need to know about testing in the CBTF.
Once you’ve completed each question on PraireLearn, the overall score you’re given will be scaled by $5x$ and capped at $100\%$, such that if your overall score is at least $20\%$ you will get $100\%$. This is also noted in the Scoring for this Assignment section.
Take note of the following (also shown on the Assessment Overview page):
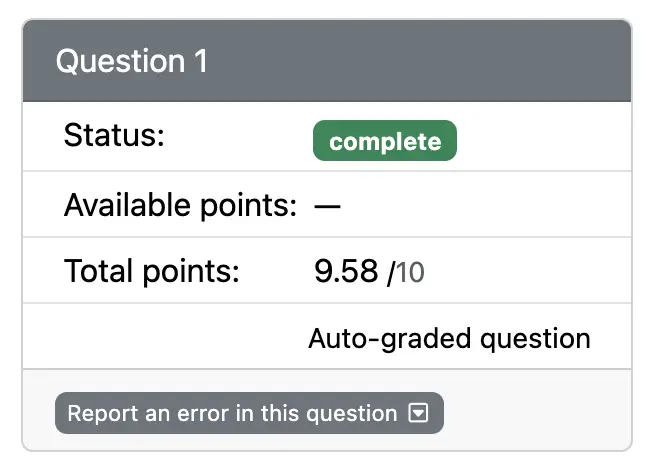
- Look at Status to confirm that each question has been graded. Questions with Available points can be attempted again for more points. Attempting questions again will never reduce the points you already have.
- When you are done, please logout and close your browser; there is no need to do anything else. If you have any saved answers when you leave, they will be automatically graded before your final score is computed.
Exam Difficulty
As a rough estimate:
- LLD Count, Clip Ends, and Map Letter Count are easier than the midterm problems
- IntList Double is about right.
VS Code Guide
Though this course officially only supports IntelliJ, because you’ll be testing and writing code on VS Code you might find it helpful to familiarize yourself with it. As such, we’ve provided a guide for you to use.
You will not have access to this or any other course website pages during the midterm.
Previewing vs. Opening Files
By default, single-clicking files in VS Code will preview the file instead of fully opening it, meaning it reuses the same tab when you click on other files. This is indicated by the filename being italicized in the tab. Double-clicking a file will open it. You can also double-click the filename of a file being previewed to open it.
For example, if you want to open both LinkedListDeque61B.java and TestCount.java, double-click on each. In the image below, TestCount.java has been opened, while LinkedListDeque61B.java is being previewed as noted by its filename being italicized.
Split-screen View
You can split-screen files by right-clicking on a file and selecting Split Right or Split & Move. Alternatively, you can click on the layout buttons in the upper right. You can also re-arrange tabs by holding and dragging them. In the image below, LinkedListDeque61B.java is on the left side of the screen and TestCount.java on the right side.

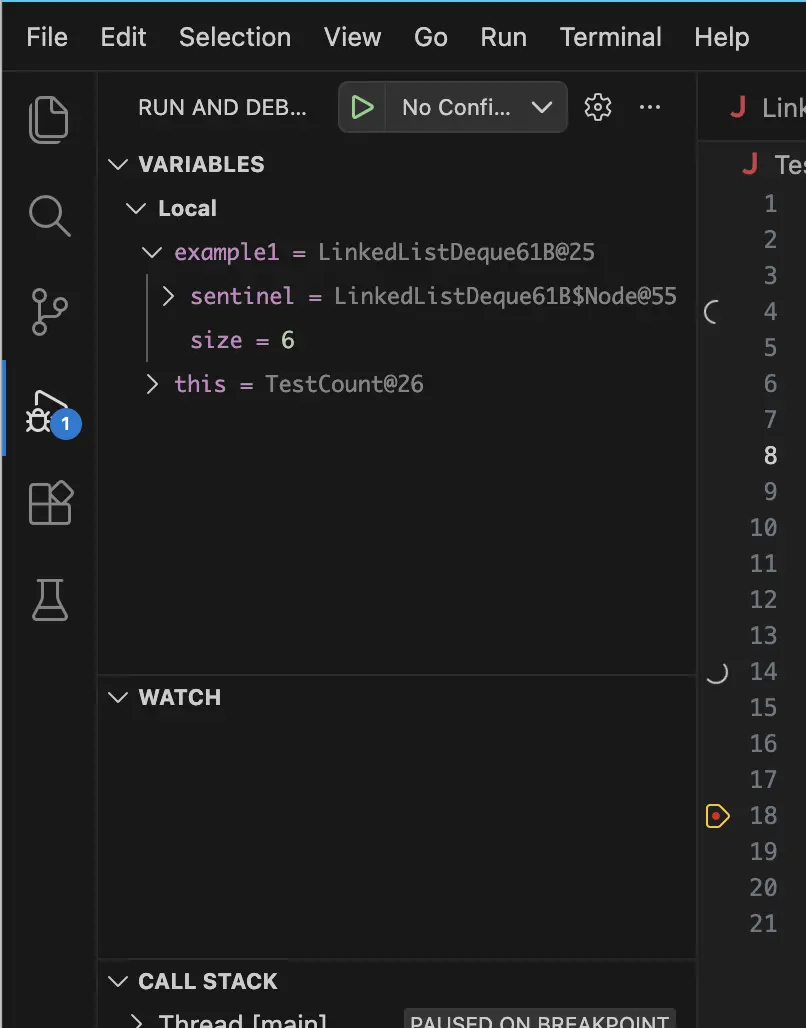
Debugger
VS Code also has its own debugger. The functionality of it is similar to the one you’ve used in IntelliJ.
For example, you can click in the gutter next to the line number in the editor to place breakpoints. Then, you can right click the green play button next to tests and press Debug Test to debug them just like you would in IntelliJ. You’ll see a navbar pop up with symbols corresponding to Continue, Step Over, Step Into, Step Out, Restart, and Stop.
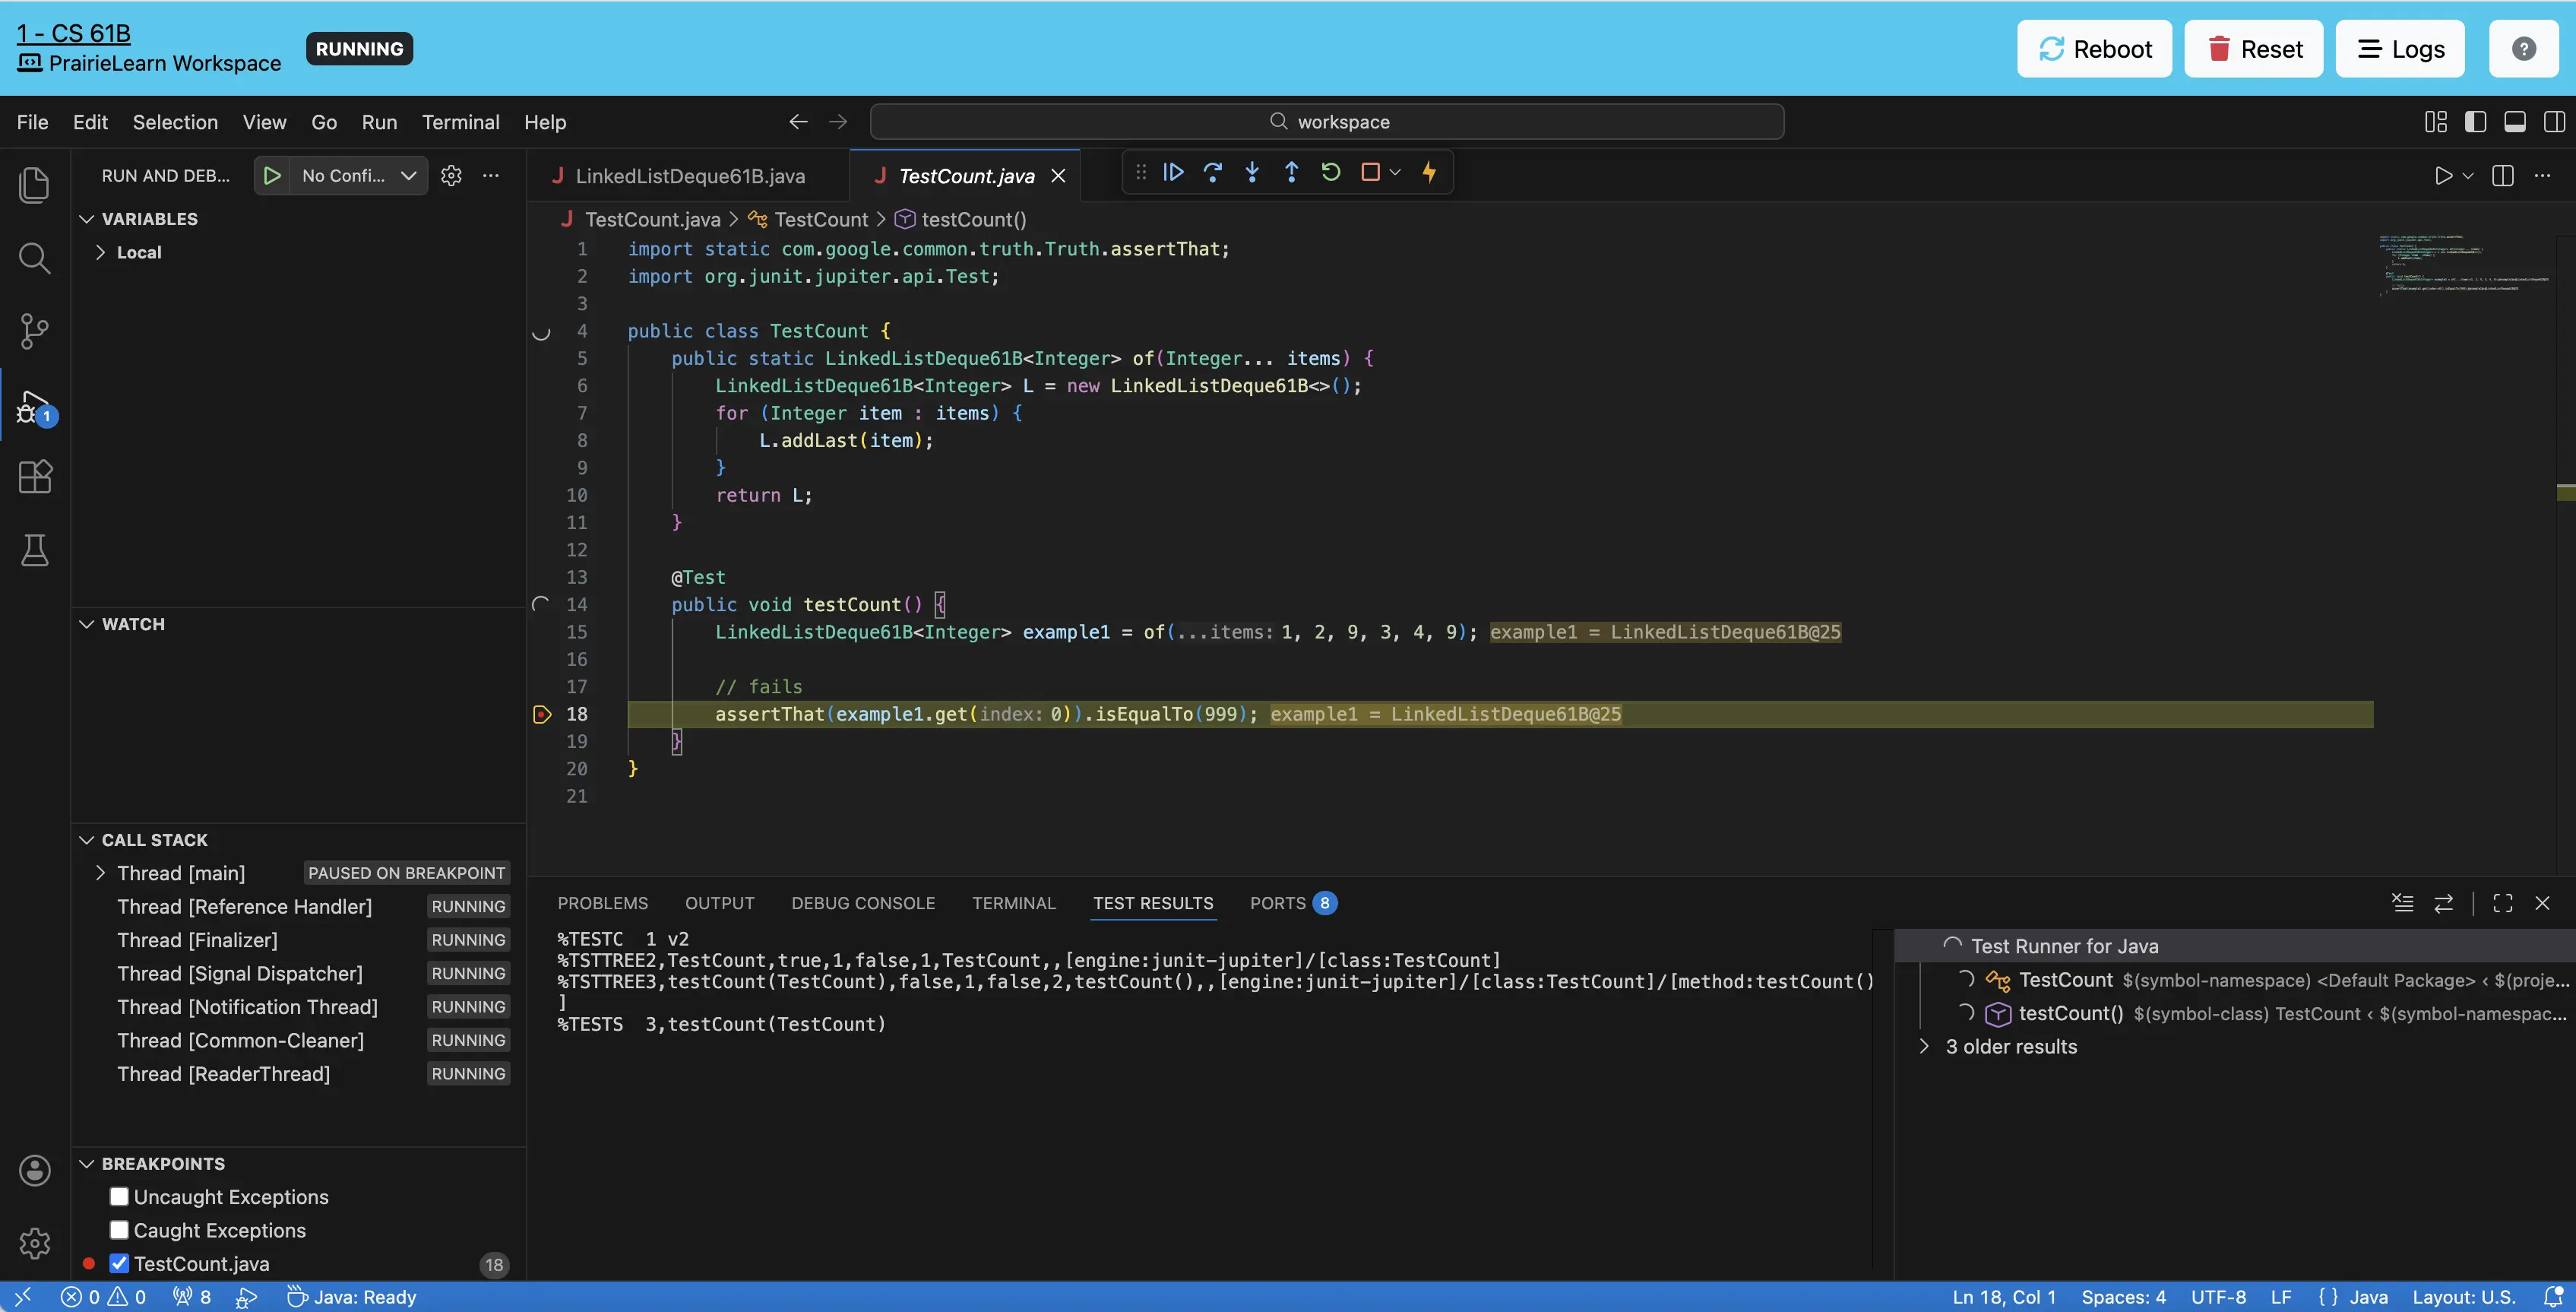
The output of print statements using IO.println() will appear in the DEBUG CONSOLE. In the upper left, you’ll also see a VARIABLES and WATCH section. In the VARIABLES section, you can see the values of variables in your current frame. In the WATCH section, you can input names of variables or expressions, which will be evaluated throughout your debugging session as you step around your code.